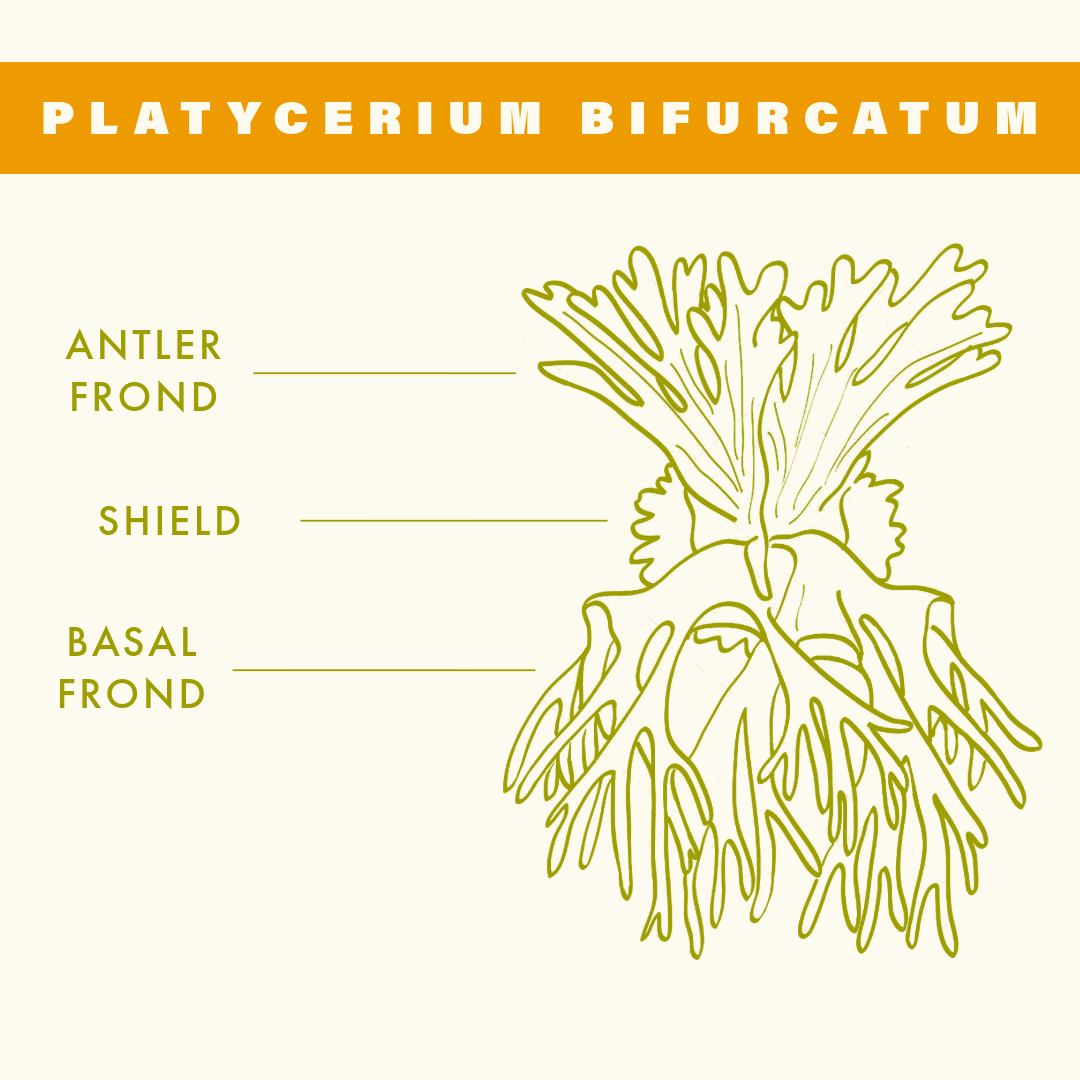
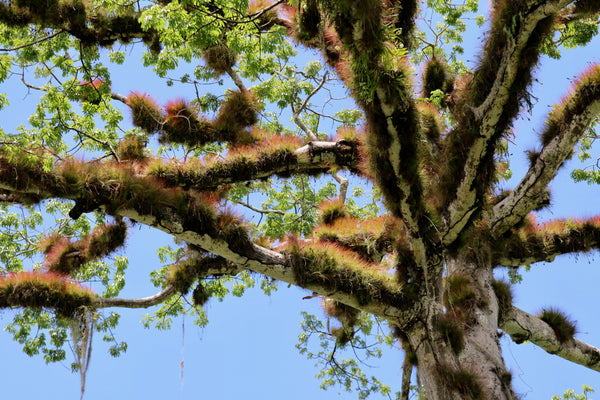
Like air plants, the staghorn fern is an epiphyte, attaching to trees and other structures with its roots and obtaining moisture and nutrients from the air. It consists of two types of fronds, basal, and antler, along with a shielded root crown containing roots and rhizomes – hidden, rootlike stems. The basal fronds are the lower leaves that shield and protect the root crown and help it to maintain moisture. These fronds are infertile and will turn brown with age. The antler fronds are the green, forked upper leaves that grow outward from the crown and reach up to three feet long. These fronds are fertile, containing brown, felt-like reproductive structures called sporangia on the tips' underside. The staghorn fern's clumping capability is impressive, with its rhizomes continuously producing pups that mature into a colony of plants creating a remarkable display of the species!
While staghorns have evolved to thrive in specific tropical conditions, they can acclimate well to life indoors or outdoors with the proper care. Temperature, humidity, and lighting are the most important factors in deciding where and how to display the staghorn fern. They thrive in warm temperatures between 65℉ and 80℉, moderate humidity, and bright, indirect sunlight. When kept outside, be sure to protect the plant from extreme temperature fluctuations, and remember to bring it inside during colder months when temperatures start to drop below 50’s℉. Staghorn ferns can live outside permanently in USDA zones 9a and warmer. Filtered or dappled sunlight is best, avoiding direct sunlight as it can scorch the fronds. In areas with high humidity, some direct sunlight can be tolerated throughout the day although the plant will also require more thorough and frequent hydration. When watering the staghorn, soak the mounted fern in a basin or shower until water runs through the bottom. Focus on soaking the basal fronds and crown and allow the plant to dry completely before rehanging.
Staghorn ferns can easily rot so it is important to water thoroughly but infrequently, letting the top 1-2 inches of the crown dry out between waterings. The mounting medium must stay moist but not soggy. Staghorns appreciate high humidity and good air circulation. Regular mistings may be necessary to provide sufficient humidity when displaying the plants indoors and during dry seasons.
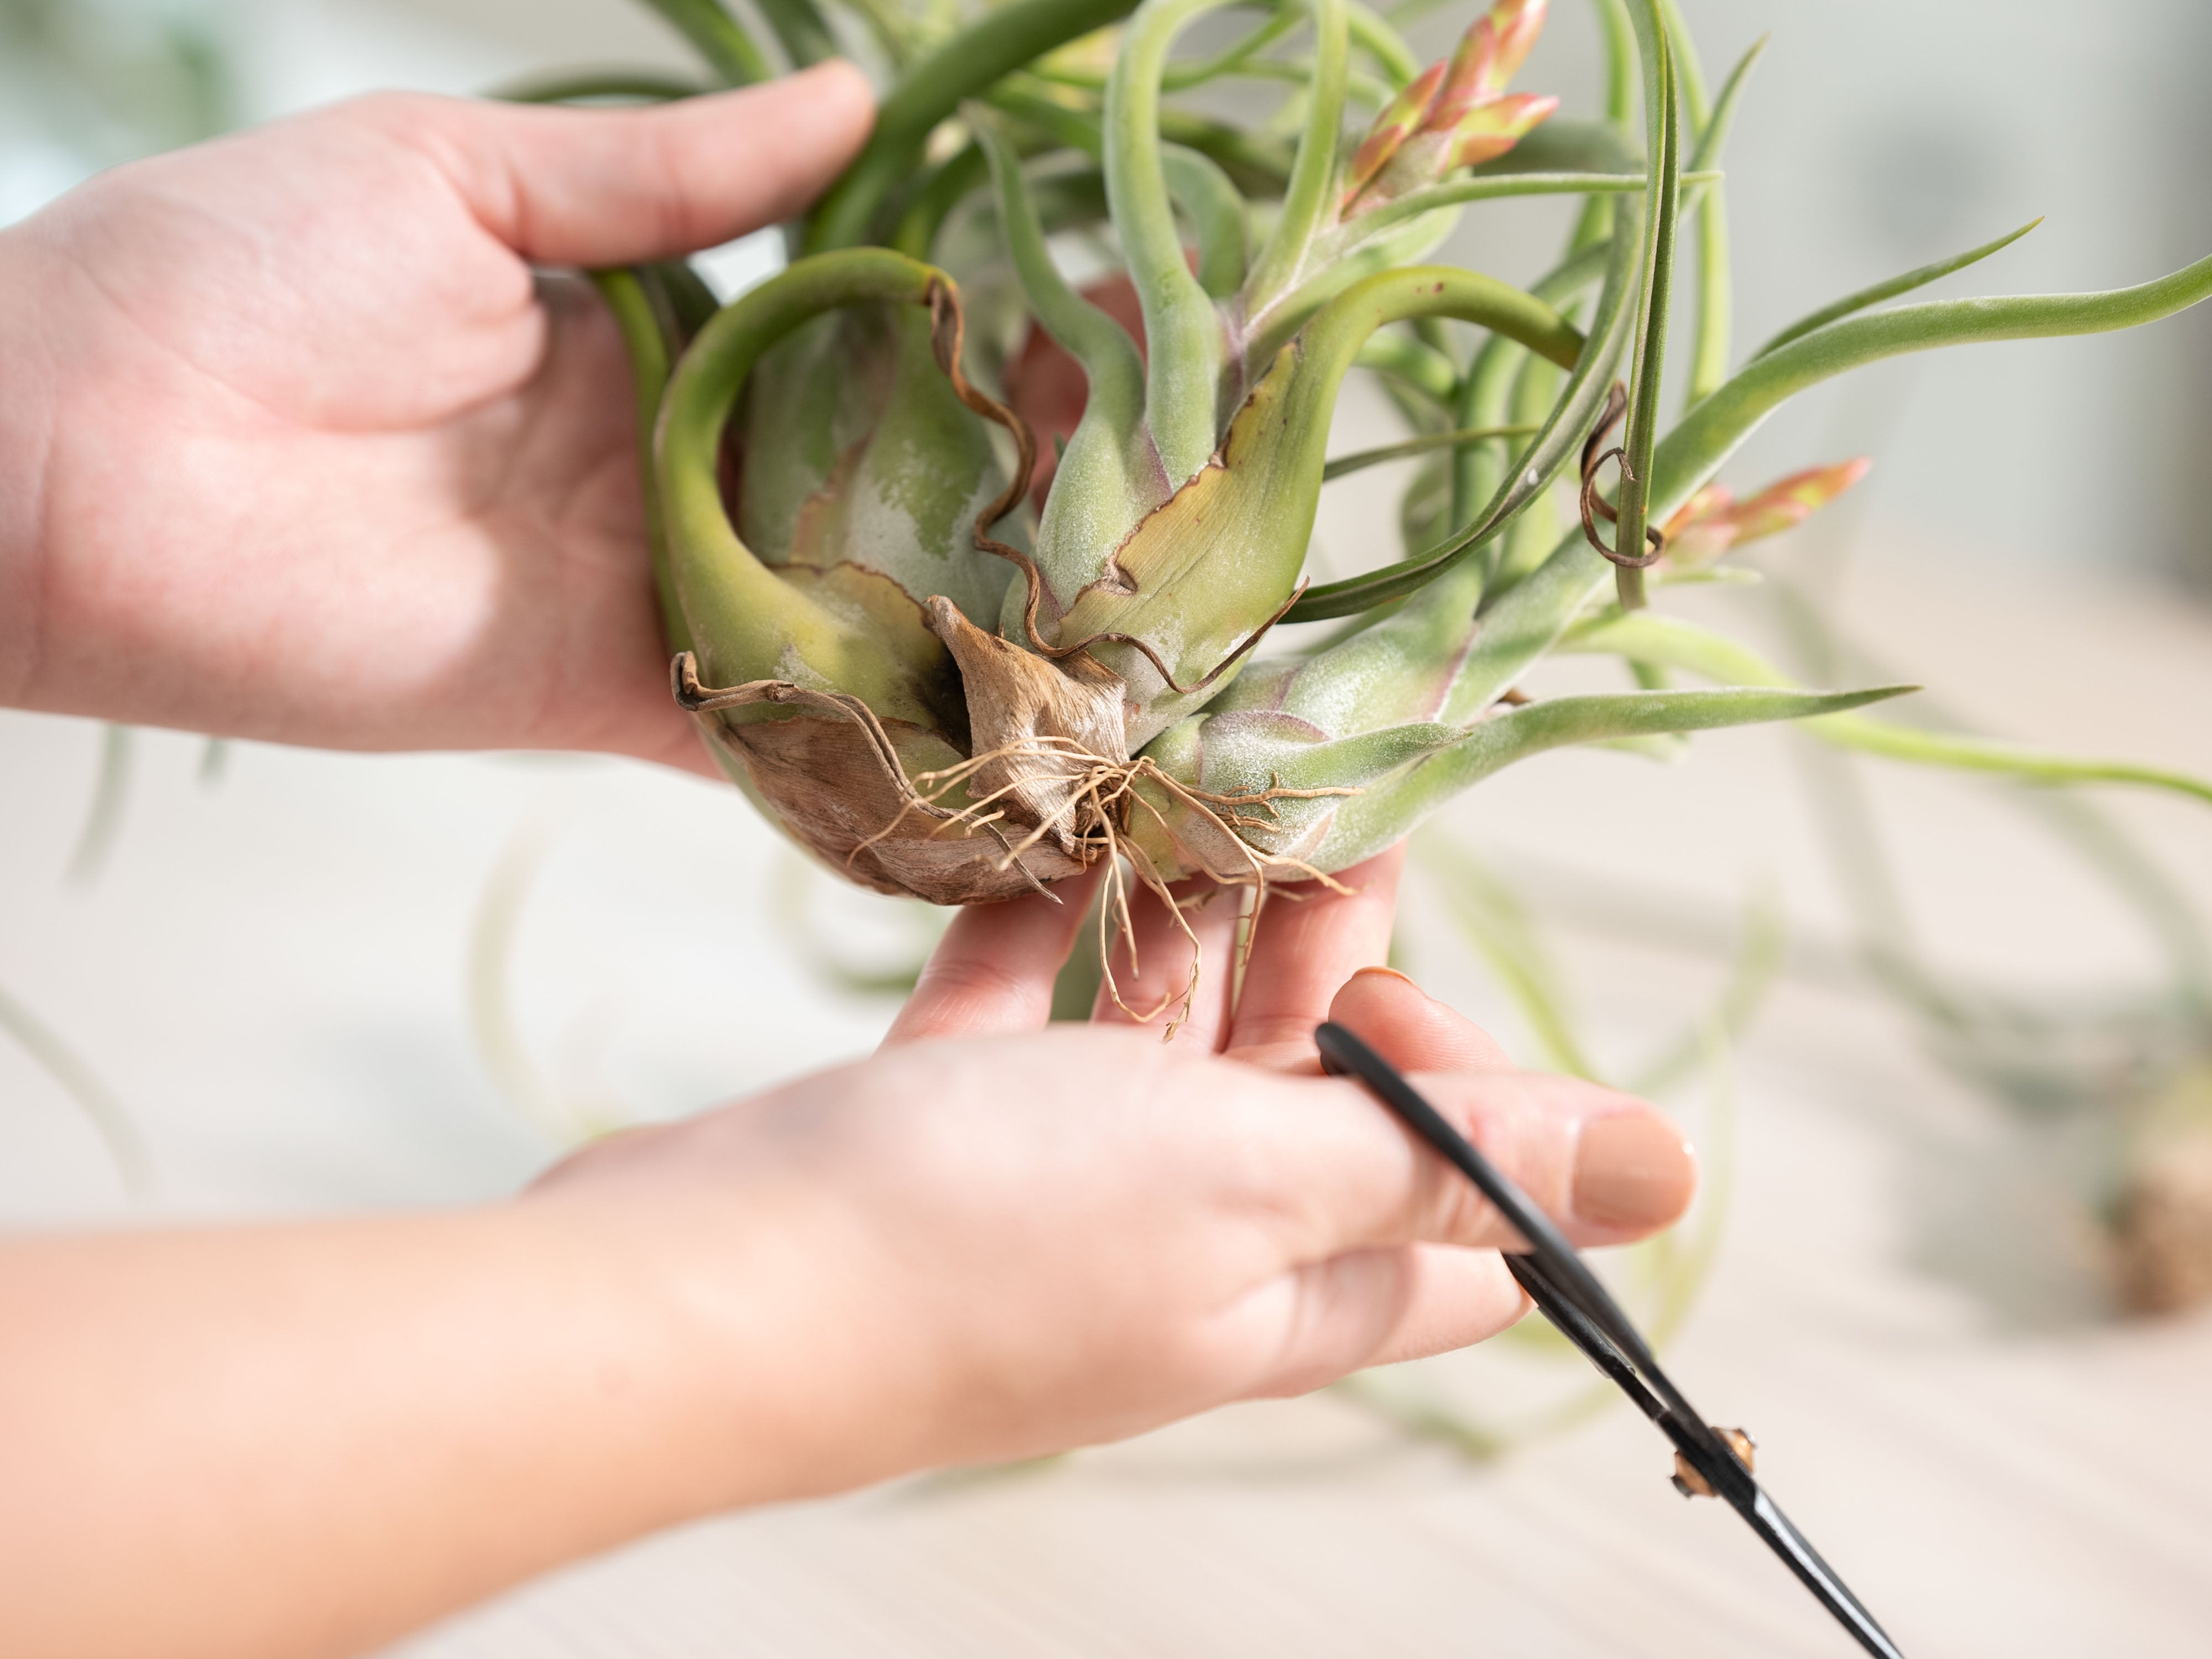
To maintain a healthy and equally attractive staghorn fern, trim away any wilted, brown, or dead antler fronds and prune any that have grown too large and are obstructing each other. Any brown basal fronds should be kept in place, even if they appear dead, as they will fall off naturally with time. You may notice white, fuzzy substances along the antler fronds. These are called trichomes and are essential for slowing transpiration (the exhalation of moisture) so be sure not to wipe away these structures.
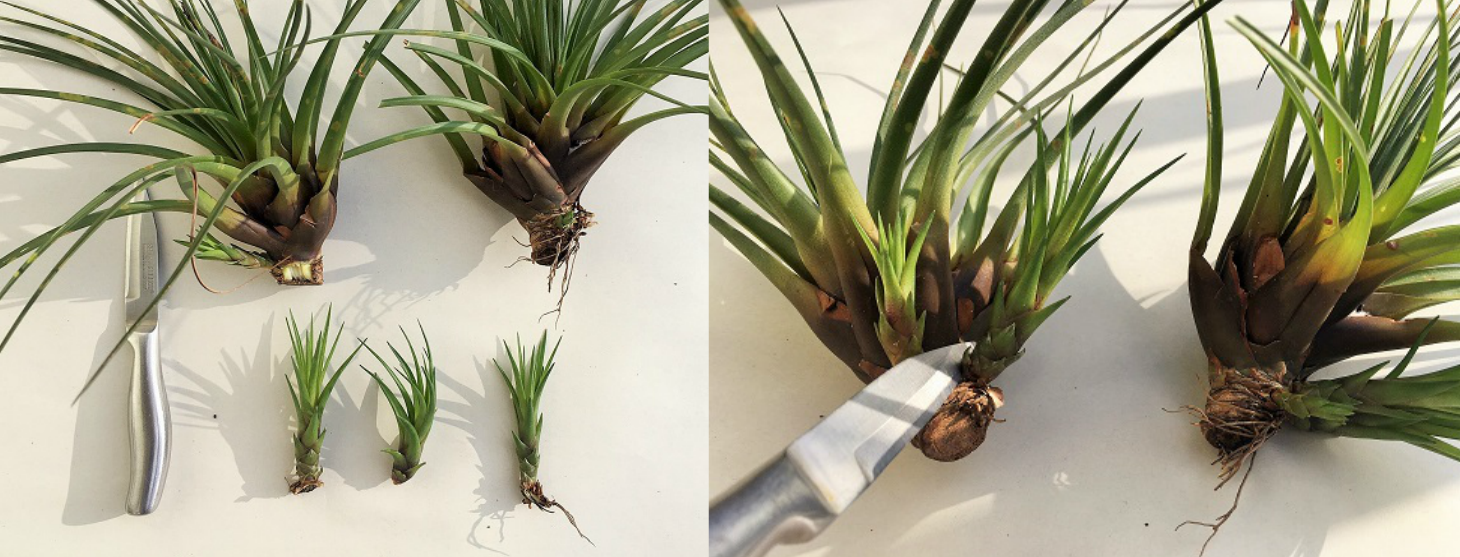
With time, the staghorn fern will produce new offshoots or ‘pups’, similar to Tillandsia, which can be left to form a large mounted or suspended clump, or they can be propagated. If you decide to separate the pups to mount or replant, make sure each piece has both basal and antler fronds along with its roots. Nestle the cuttings into a potting medium, such as sphagnum moss, and keep them warm and moist until they are well-established. Allow ample time for the staghorn ferns to adjust and root, they are slow growers but worth the wait!
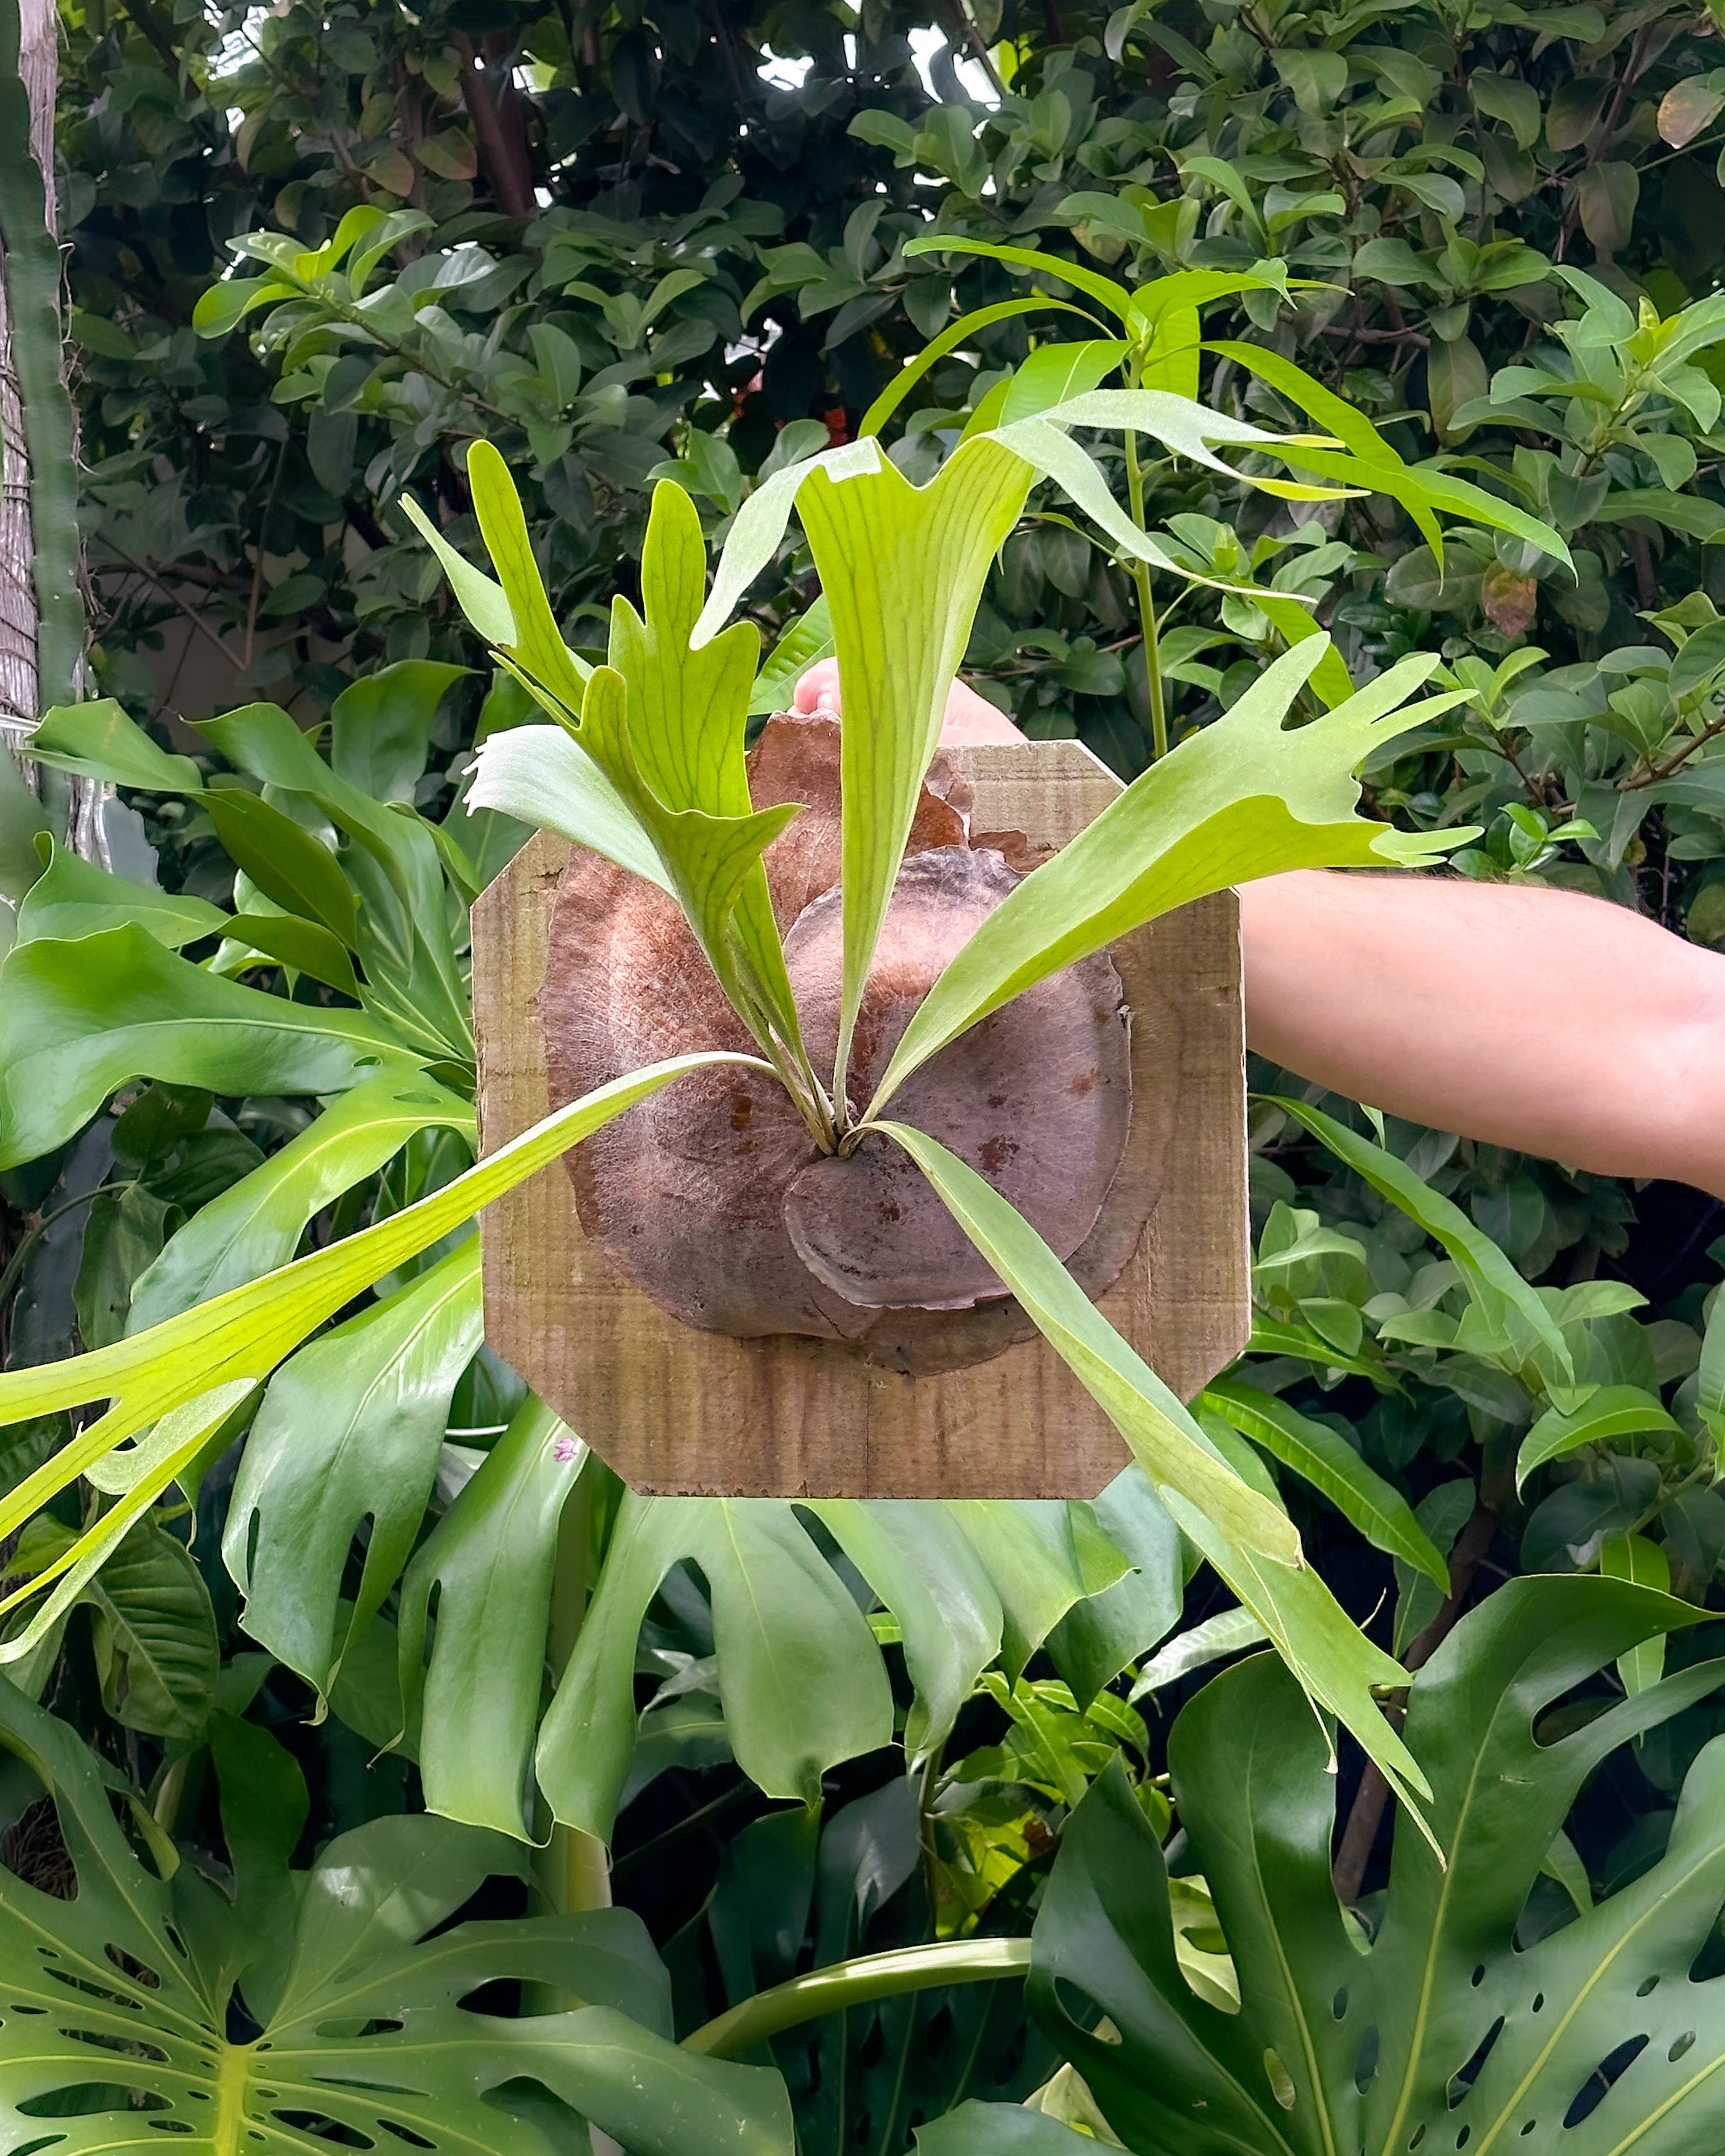
One of the biggest draws of the staghorn fern is the multitude of ways you can show off its unique form! Loosely pot the plants in a free-draining mix like sphagnum moss and orchid bark or hang them in baskets. To create a striking symmetrical form, try hanging the clumping ferns from a sturdy tree branch with a rope or chain. Mount on a tree trunk to mimic its natural habitat or display it on the wall of a porch or lanai. Our staghorn ferns come pre-mounted on a cedar plank for a quick and easy installation. During colder months, or if you prefer to keep your fern inside, be sure to hang, mount, or pot your staghorn where it can be admired while also receiving proper lighting. Try to avoid moving the plant frequently, however, as staghorn ferns are quite sensitive to environmental changes. No matter how you display your staghorn fern, it is sure to be an eye-catching, rewarding, and captivating piece for your home or garden!
Thank you so much for ordering our living handmade Christmas Trees! For every tree sold, Air Plant Supply Co. will donate an extra $3 to support our Primary Schools in Guatemala. Once you finish admiring its beauty it is time to water the tree. Follow the instructions below.
We did several experiments to make sure your tree arrived as beautiful as possible. If your tree appears a little squished, water thoroughly in the sink following the first care instruction below. Within a day your air plant tree will take on a more symmetric form.
The best way to water your tree is to place it in a sink. Thoroughly wet the leaves with water using the faucet or sprayer if you have one. Let the tree drip-dry for 30-60 minutes and place it out for display. Water your tree this way once a week. If it appears dry between waterings, consider spray misting the leaves every three to five days.
Our Christmas Trees are made of living Tillandsia air plants. When deciding its placement, consider cold drafts, furnace vents, radiators and fireplaces (if they are in use). The air plants are sensitive to drying out if they are too close to heat sources. Lighting is important. Provide bright natural light if possible for at least five hours a day. If you have found that magic spot in your home for your other air plants, the air plant holiday tree should do well there!
Sometimes a plant just doesn’t make it! If it appears broken or severely damaged, gently remove it and discard. Send us an email to info@airplantsupplyco.com and we can send you a new plant to replace the missing one. We will replace dead plants one time up to 30 days from the tree’s arrival.
When it comes to air plant care, the most common questions and concerns we receive are regarding watering techniques and routines. While it is hard to pinpoint the exact method needed for any given plant in any given environment, some factors can be considered to make sure your air plants stay properly hydrated. Lucky for us tilly lovers, the air plants have a way of showing us when they are thirsty, providing us with the opportunity to soak them before it's too late! In this blog, we’ll discuss the physical characteristics of hydrated and dehydrated air plants but before we dive into care tips, let's review the basic nature of Tillandsia to fully understand their watering needs.
Looking for more basic care informations? Check out our primary Air Plant Care page.
Ready to rehydrate? Start by giving your tilly a good soak. Fully submerge the plant in room-temperature water for at least 30 minutes, giving the leaves plenty of time to absorb the water and nutrients. Once removed from its bath, gently shake the excess water and lay the air plant upside down or on its side on a towel or drying rack, allowing a few hours for it to dry completely. Be sure to provide adequate air circulation during this step as stagnant air can lead to rot, fungus, or mold. While air plants are overall hardy and drought tolerant, don’t push them to the point of suffering, and be sure to water them frequently, especially in warmer or drier locations! Weekly soaks or thorough rinses along with supplemental mistings in between will keep your plant with happy and hydrated leaves. For optimal health, try a monthly dose of our Ready-to-Use Air Plant Food, specially formulated for Tillandsia!
Still having trouble keeping your Tillandsia healthy? Read through our What’s Killing My Air Plants? blog to learn about other factors to be considered when caring for an air plant.
You may notice there are a few different structures that make up the inflorescence, or the branching reproductive portion, of the air plants. The most visible parts are the stalk or stem, the bract from which the flowers emerge, and the flowers themselves. Air plants will boast both colorful bracts and flowers ranging in colors from purple to orange to bright pink. The duration of blooming flowers will vary among species and can last anywhere from a few days to several weeks. The bracts of the air plants tend to last longer than the flowers and their attractive coloration can often last for several months after the spent bloom has passed. Larger species of Tillandsia, such as the Xerographica, tend to have longer bloom cycles, some over a year!
Once your bloom has passed, you can either leave the dried flowers and bract intact to observe the plant’s natural cycle or you can simply remove the flowers and trim the bract towards the base. Trimming the inflorescence will not harm the plant and will help to encourage pup growth. The timing of pup growth is dependent on the plant’s care and environment. The process is slow so don’t be discouraged if the offspring don’t appear immediately after the bloom has passed. Be sure to provide adequate water and sunlight for the plant and if you have air plant fertilizer, now is a great time to use it! Once the pup or pups have started to grow and mature, the mother plant will normally start to fade and eventually die off. The pups can be removed once they are about 1/3 to 1/2 the size of the mother plant to live on their own and eventually start to mature and bloom themselves. For further details on pup removal, check out our "Easy Propagation of Air Plants" blog. Some species of air plants such as the Ionantha family, are prolific pup producers and will eventually grow as a clump of several plants if left to reproduce naturally.
If you have a Tillandsia that has yet to bloom, our “How to Encourage Your Air Plant to Bloom” blog discusses tips for achieving this beautiful and exciting cycle.
Follow us on Instagram and Facebook for further care tips and fun air plant news! ]]>
Every air plant starts its life as either a seedling or an offset, also known as a “pup”, from the mother plant. The air plant seeds are encased in hair-like “parachutes” which travel through the wind until they attach to their new host, typically a plant, tree or rock. This is where the Tillandsia will slowly develop, often spending the first two years of its life under an inch tall! While air plant seeds tend to result in bigger and healthier specimens (like our plants!), growing an air plant from seed is a tedious and time-consuming task – check out our Sustainable Farming blog to learn more about the process. Most air plant owners are more familiar with raising air plant pups which grow and bloom much faster than seedlings because that’s how air plants reproduce in a houseplant setting.
An air plant’s growth rate is dependent on the species and the type of climate or environment it lives in. Oftentimes xeric plants, namely the great Xerographica, will have a longer and slower growth cycle than our mesic friends such as the Ionantha or Abdita. The amount of light, airflow and humidity that is provided will affect its health and how fast it will grow. Following basic Care Tips will help to raise a healthy air plant that will one day bloom and reproduce!
A mature air plant will bloom once in its lifetime and the blooms can occur quickly or take several years to appear. Many species leaves “blush” with bright, magnificent colors ranging from orange to pink to purple. The flowers that the blooms produce are equally as striking and can last several days to many months, depending on the species. The rate at which an air plant blooms is also dependent on its care and environment. If you are eagerly awaiting for your air plant to bloom and flower, check out our How to Encourage Your Air Plant to Bloom blog or maybe try fertilizing your air plant with our specially formulated Air Plant Fertilizer! Once the air plant has bloomed, the flowers and bloom stalk will eventually die off as the plant prepares to reproduce via a seed pod or pups. The spent blooms can be removed for aesthetic purposes, learn how to safely trim yours here.
After the air plant’s blooming cycle, you will notice small pups emerging near the base of the plant, usually between the bottom leaves. Most air plants will grow between one and three pups, each with a distinct center of their own that distinguishes them from the other leaves. As the pups grow large enough to support themselves, the mother plant will often fade and die off. However, each pup will continue to survive and follow the life cycle by growing into a parent plant! Pups can be propagated once they are about one-third the size of the mother or they can be left attached to form a clump.
For more information about air plants, explore our What are Air Plants and All About Air Plants blogs. Don’t forget to follow us on Facebook and Instagram for air plant highlights and upcoming sales!]]>Air plant...hmm? Does that mean they live off of only air? Are air plants just set-it-and-forget-it plants? Are they even living? These are some of the most frequently asked questions we receive about tillandsia at Air Plant Supply Co.
The simple answer is...no, they need more than air to survive and yes, they are very much living. Although air plants are considerably lower maintenance than most house plants, they still need light, water and nutrients!
Tillandsia get their nickname "air plant" because they are an epiphyte and live without soil or "in the air". Epiphytes are plants that attach themselves with roots to other plants for shelter and support but are not parasitic. These types of plants have evolved over time to live without soil so they can have better odds of survival! The forest floor is thick with competing plant life so being able to live above the ground has allowed these plants to survive and even thrive far away from danger. Being closer to the canopy of trees also allows air plants to absorb more indirect sunlight that is essential for energy production.
So, if air plants don’t grow in soil how do they get nutrients? Air plants have specialized cells called trichomes which cover their leaves and absorb water, light and air. The amount of trichomes on an air plant varies on the climate the species originates from – check out our informative blog "What are Hydric, Mesic and Xeric Air Plants?" to learn more about plant's native climates. Species from very moist, humid environments will have less trichomes than species from rocky desert climates, such as Tillandsia Xerographica and Tillandsia Harrisii. These trichomes are what the plant uses to pull moisture and the nutrients needed for its sustenance from the air and are the reason air plants can survive without soil! So cool, right?
Want to learn more about the genus, Tillandsia? Read our blog "All About Air Plants" for more info!
Follow us on Instagram and Facebook for more air plant tips and tricks!
]]>Plant lovers know the immense satisfaction of when their love and hard work pays off and their plant babies finally bloom! Tillandsia, also known as air plants, are no different. As members of the angiosperms (meaning flowering plant) family, all air plants will produce blooms as part of their life cycle. Tillandsia do not bloom until they reach maturity and, thus, are ready to produce off-spring or pups. Since tillandsia do not have any age characteristics that can be seen with the naked eye, patience is key! That being said, there are actions you can take to guarantee your plant reaches maturity and is healthy enough to bloom.
As any mother knows creating offspring takes lots of energy! Below are some ways to maximize your air plant’s energy to help achieve the beautiful blooming process.
Fertilizing your tillandsia will help ensure they are receiving all the nutrients they need – especially because it is not always clear what vitamins and minerals are in the water you use to hydrate your air plants. Make sure you use fertilizer that is specifically formulated for tillandsia such as our 12 Month Supply Grow More Air Plant Fertilizer. To use our Grow More Air Plant Fertilizer, simply add 1/4 teaspoon to a gallon of water and soak your air plants for 20 to 40 minutes once per month! Tillandsia do not receive nutrients from their roots in soil which is why we use a special type of nitrogen in the tilly fertilizer so they are able to absorb and convert it into usable energy.
A word of caution: do not over fertilize your air plants. It can cause the plants to suffer from nitrogen burn and this will cause them to die!
Displaying tillandsia in your home is an excellent way to bring the outdoors inside, however, they still need light as if they were outside – we recommend daily indirect light (unfortunately, windowless bathrooms and other windowless rooms are not optimal for your air plants to live). Bringing your air plants indoors may result in them not receiving enough sunlight to produce the energy needed to bloom which is why you need to be extra conscious of where you place your air plants inside! Additionally, tillandsia can sunburn, just like people, so it’s important to provide a good balance of direct and indirect light – mid-day sun can be too strong and burn your air plants. One to three hours of direct morning or evening sun is great for tillandsia since, typically, at this time of day the suns rays are not as strong. Otherwise, consistent filtered light is great as well. A good filtered light location would be somewhere near a window where the sunlight is getting to your tillandsia but not directly shining on it such as on a coffee table or side table near a window or on a kitchen counter or shelf!
Looking for more air plant care tips? Check out our essential care blog, "How to Keep Your Air Plants Healthy" or "What's Killing My Air Plants?".
]]>Along with their unique physique and robust blooms, Tillandsia air plants are favored among plant lovers due to their simplicity and low-maintenance care. However, once in a while air plants do require additional care to keep their fresh appearance and ensure optimal health. Whether maintaining the leaves, removing unsightly roots, or pruning spent blooms, trimming your air plants is easy and only requires small scissors or shears and some basic air plant knowledge!
As air plants mature or adapt to a new environment, they naturally shed their bottom or outer leaves as new growth forms. This is a normal process and does not necessarily indicate any health issues. If your plant has dead, decaying or dried-up leaves on the base, you can gently pull or peel them off without harming the plant. Not only does removing this dead plant matter help keep the plant beautiful, but it also helps the plant to regenerate and provides more light to the new growth! Additionally, old leaves can hold extra moisture after waterings which is more likely to cause rot in your air plant and, thus, death.
Use caution when removing leaves, as they may be providing shelter to a newly forming offset – also known as pup. In this case, it is best to leave the leaf until the pup has grown to at least one third of the mother plant. Want to learn more about air plant propagation and pup removal? Read our blog "Easy Propagation of Air Plants"!
You may have an air plant that has some bent, broken or damaged leaves. This is not uncommon for the delicate species and does not jeopardize their health! To mend the leaf, simply trim at an angle where it is bent or damaged – the angled cut will give the plant a more natural look. The same technique can be used for leaf tips that are browning. We often see this occur in plants with wispy leaves such as Ionantha as well as plants with aged leaves like the Streptopyhylla and Xerographica. Trimming the ends will not harm the plant but be careful not to cut too much of the healthy leaves! The plants need this surface area to absorb their nutrients. If you find your plants have a substantial amount of brown or dried tips, then this may be an indicator that they are dehydrated or are receiving too much direct sunlight. Check out our blog "What's Killing My Air Plants" to discover what could be harming your air plants and how to troubleshoot to resolve the potential issue!
Since air plants are epiphytes, they absorb nutrients from their leaves as opposed to their roots. The plants’ roots serve the sole purpose of anchoring them to their surroundings such as trees and rocks – they are not necessary for survival. If your air plant has visible roots then feel free to trim them off but avoid cutting into the base of the plant! You can also keep the roots to help the plant attach to a vertical display. Root removal is all about personal preference – do you like a more clean, maintained look or more natural?
After you have enjoyed the beautiful blooms your air plants have produced, you may leave the dried flowers on the plant or remove them for aesthetic purposes. Again, up to you! To do so, you can either gently pull the dead blooms from the bracts or cut the bloom stalk close to the base. Removing the spike will help the plant to redirect its energy to create pups.
Looking for more care tips? Check out our blog "How to Keep Your Air Plants Healthy" to learn more!
]]>So, what is that perfect gift? An air plant of course! We might be a little biased, but air plants are a great combination of traditional and unique. Air plants are easier to take care of than the traditional bouquet of roses (c’mon, we know you’re not going to remember to change the water). Plus, ordering air plants online saves you the hassle of that last-minute shopping trip.
Whether you’re shopping for your valentine, galentine, or even just yourself (because self-love is important too!), let us ease your Valentine's Day stress with our air plant gift guide:
For the nature lover in your life, this beautiful cork bark display cannot be ignored. Inspired by the way air plants grow on trees in their natural habitat, this display allows your special someone to bring the tropics into their own home.
Not the most confident DIY-er? We've got you covered! Here are some design tips on how to get started decorating your cork bark display.
Simple, chic, and stylish, this glass terrarium is a wonderful addition to any room! The kit comes with a hand-blown, double sided glass terrarium, river rocks, moss and three Ionantha air plants. Build the kit with your valentine and decide where the new air plant eco-system will be located.
The main attraction of air plants, the Xerographica! Gift your valentine the ultimate air plant that is (almost) as lovely as them. Plus, the geometric glass terrarium allows your loved one to admire their Xerographica from all angles!
How cute are these white vases? They are the perfect addition to any desk or table OR try hanging it by a window. Plus, each one comes with an air plant that is hand-picked to fit each vase, so you can be sure your valentine is getting the best selection possible!
This elegant, modern ceramic pod is a great gift that will fit in any home. Its simple design will allow your special someone to show off their plants from multiple views thanks to the three spacious cut-outs.
If your valentine is a lover of all things DIY, then this glass terrarium is the ideal gift for them. This diamond shaped terrarium is a beautiful air plant display that would look lovely on a bookshelf or hanging for all to admire. Add on the terrarium kit and two air plants to give your valentine the ultimate customization options. This gift will allow that special someone in your life to be creative and make their own little glass garden they're sure to love!
With this many good gift options, we know it might be hard to make a decision...lucky for you, we got that covered. A gift card is always a good way to allow your significant other to choose the air plant that is right for them!
We are confident that one of these air plants will be the perfect gift for whoever you’re gifting this February 14th! Check out our website for even more potential gift ideas this Valentine's Day.
]]>There is a vast variety of Tillandsia air plants, each with their unique characteristics! While most houseplants have a smooth leafy texture, air plants will differ with each species which is why it is necessary to be observant of your various air plants. The most uncommon textures are typically noticed with Juncea, Melanocrater (as seen in the image to the right), and Fasciculata. These plants have brittle leaves and dry bases that are comparable to those of pinecones. Another natural and healthy feature of these plants is their brown, cone-shaped bases. Bulbous air plants such as Bulbosa Guatemala and Butzii are unique as well with their hard, shell-like texture, again with brown bases. As long as these bases are firm and the leaves are intact, the air plants are healthy!
As air plants grow and mature, they go through their different color cycles and often blush with red, pink, or purple colors. Some species have much darker shades of purple when they blush and the colors can range from the bottom of the plants to the tips of the leaves. Seleriana and Caput Medusae will commonly have dark blushing colors towards their bases while Juncea and Filifolia plants will have darker shades on the ends of their whispy leaves. Remember that the different colors are a unique trait that naturally occurs in healthy air plants. Before assuming a plant is unhealthy at first glance upon arrival, give it some time to adjust to its new environment and care for it as usual. Maybe even reference our air plant product listing photos for comparison of what you can expect the plant to look like. You will find that the plants will thrive, even with brown bases!
If you are still concerened about the wellbeing of your air plants, read more on our Air Plant Care page or our blog, "What's Killing My Air Plants?". Or feel free to contact our amazing customer service team at info@AirPlantSupplyCo.com.
]]>Although generally low maintenance, air plants can be susceptible to health issues due to environmental factors or improper care just like any other plant or living thing! By reviewing this list of topics, you can be confident in diagnosing and preventing health problems to grow happy and healthy air plants.
Proper hydration is key in keeping air plants alive. Too much or too little water will cause your plant’s health to decline. The best way to keep your plant hydrated is to soak it for 20 - 30 minutes weekly. Excess water can then be gently shaken off and then allow the plant to dry for a few hours before replacing it into its enclosure, container or display.
Each plant is unique so watering frequency may need to be adjusted depending on how the plant responds after each soak! An under-watered plant will show signs of dehydration through leaves that are curled or folded as opposed to open and flat. Be careful not to overwater your air plants, however, and be mindful that some species such as Aeranthos and Tenuifolia will show more drastic signs of hydration while others, Ionantha for example, will have a more subtle change if they are over or under-watered. Overwatered plants often suffer from rot which is why the plants must dry completely between waterings and before being placed into an enclosed space.
If you plan to keep your air plants outdoors, it is best to do so only throughout the warmer months and bring them inside once temperatures start to drop below 40 degrees Fahrenheit. Freezing temperatures are intolerable for air plants and they will not survive cold winters outdoors.
The hardiest air plant regarding cold weather is Spanish Moss, however, as it is native to the southern and southeast regions of the United States where temperatures can drop as low as the twenties. During the winter months, air plants may require additional care which can be viewed on our Winter Care blog.
Even the most well-maintained air plants will someday expire. Luckily, as the plants grow, mature, and bloom, they will eventually reproduce through pups and seedlings allowing the organism to live on. Some air plants can even bloom more than once and will produce more than one pup. The pups can either be separated from the mother plant or left alone to naturally form clumps.
We hope this helped you diagnose your air plant issues. Be sure to check out our other informative blogs or contact our helpful customer service team at info@AirPlantSupplyCo.com.
]]>Air plants thrive in outdoor settings throughout all regions of the United States during the warmer months of the year. However, air plants are tropical species so moving them indoors if or when temperatures drop below 40 degrees Fahrenheit will be necessary for wintertime survival. Since your plants will experience the differences in temperature, humidity, light, and air circulation once brought inside, they will need to be tended to with special care to allow for a safe adaptation.
Read further to learn how to winterize your Tillandsia!
You have probably noticed that if you heat your home in the winter with a furnace, fireplace, or radiator then the air will be much drier than normal. This can be damaging to the air plants so we recommend adjusting your usual watering schedule accordingly. Signs of air plant dehydration are curling leaves and dry tips. Additional weekly misting may be necessary in addition to soaking. You can also place a tray of water near the plants to help keep the area more humid!
Extra tip: avoid placing your air plants near drafty windows, vents, and air returns. Click here to learn more about signs dehydration in air plants.
Air plants require fresh, circulated air to absorb nutrients. If placing the plants into an enclosed display or terrarium, make sure it is not too cramped and that the plants still have access to proper airflow.
Good luck with winterizing your air plants! Feel free to reach out to our team of air plant experts if you have any questions or concerns at info@airplantsupplyco.com.
]]>
So, is your air plant mesic? One way to tell is if your plant has shiny and waxy leaves without as many trichomes as xeric air plants that come from dryer areas. Some species of air plants that can be classified as mesic are Abdita Multiflora, Bulbosa Belize, Bulbosa Guatemala, and Butzii. Mesic plants are used to mixed light and won’t want to be introduced to direct sunlight. Humid climates are the ideal place for these air plants, so misting your plant during the week is a good practice to keep them healthy!
Some species of xeric air plants are Xerographica (which have long mint-colored leaves), Circinata, and Harrisii. The light coloring of these plants is due to their evolutionary need to reflect light in the hotter conditions they come from. Ionantha are a popular xeric species that require a bit more attention than the average air plant. Their small size makes them prone to dehydration.
Direct sunlight isn’t always what plants need to thrive. In fact, air plants are happier when they get indirect sunlight or bright artificial lighting for several hours a day as this prevents their leaves from burning. A useful tip is to keep your air plants at a temperature that you find comfortable. If you’re too hot, your air plants probably are too.
If air plants can feel too hot, they can also feel too cold. A majority of air plants can’t withstand temperatures below 32 degrees, with a few exceptions such as Spanish Moss. Most commercially sold air plants won’t tolerate these freezing temperatures, so if your outdoor plants will experience conditions below 45 degrees it would be best to move them inside.
High concentrations of fertilizer could burn your air plants. We suggest diluting your fertilizer with water and using this to soak your plants once a month or every fourth soaking. If you would rather mist your plants than soak them, a simple way to make sure they still get fertilizer is to add fertilizer to the water you mist with and hydrate the plants that way.
Most air plants are from cool, dry places like deserts or highlands. Because of this, a majority of air plants don’t do well with excess moisture. Make sure to completely dry off your plant quickly after soaking them by leaving them near a ceiling fan, for example. Even if you mist your plants, they should still be removed from their container to make sure they are fully dried. Taking the time to make sure your plants are completely dry will prevent them from dying of root rotting. Spanish Moss, specifically, should be given full air flow on all sides--any parts that are flat against a wall or surface will die.
Like most living things, air plants have a life cycle of growth, blooming, and reproduction. Mother plants will put their energy into producing small offset plants. By the time the mother plant has produced all she can, the offset plants will be the size of the mother plant, continuing the cycle. The original mother plant will eventually decline and dry up. When your air plant begins producing babies, you can either divide the new plants or let the plants clump as they would naturally.
Shop our low-maintenance air plants to start or expand your plant collection!]]>Tillandsia air plants are known as a plant species that are low-maintenance and, for most, quite hard to kill. However, without proper love and care, they can and do die. In short, air plants require a couple hours daily of indirect light and weekly soaking or misting with water. For complete hydration, we recommend a 30 minute soaking in a bowl of lukewarm water followed by a thirty minutes drying period to avoid rot. Following this methodology, water your air plants every week to 10 days. For more detailed care instructions check out Air Plant Supply Co’s care page.
Once you have the basics of air plant care down, it is important to consider other environmental factors that may be harmful to your plants. Recently, copper has become a home decor trend. Curled copper wires to hold or stand-up your air plants or glass terrariums faceted with copper, although beautiful, could be harmful if they are indeed made out of pure ‘Cu’. This may be controversial because copper is a favored way to display air plants, but copper is toxic to nearly all plants! I get it, the natural green of air plants paired with the contrast of copper is a winning combination, but it is non-negotiable–keep air plants away from copper!
We see copper used with air plants all the time, but before you panic, there is a silver lining (get it?)–some plant accessories may not be made from real copper. There is a chance you have copper-dipped or copper-coated accessories which essentially mean they are painted to look like copper but not real copper, so they will not harm your plants.
Firstly, was the item expensive or inexpensive? Copper is a rather costly metal. It is fair to assume that cheap items are not real copper. Secondly, what does it look like? Look at your item in bright light–real copper should have a reddish-brown hue, like a penny. Real copper will also tarnish and patina with time as it oxidizes. Is the item slowly turning a bit green? Is there fuzzy, flaky residue on the surface that can be chipped away with your fingernail? Likewise, real copper can be polished, removing the patina, to show the vibrant orange color again. Something that is coated with a copper-colored paint will not tarnish, oxidize, or be able to be polished. If you are using a wire to make plant air plant stands, notice what a cross-section of the wire looks like--is it copper-colored throughout, or is the interior silver or black? The latter would mean you have a wire that is dipped to look like copper, but it not.
A final way to test would be by sound. What does the accessory sound like when you tap with another metal item like a spoon? Copper is a soft metal so it should give a muted sound. Something that gives off a higher-pitched sound is likely not copper. Further, if it feels and sounds like plastic then it’s probably plastic which means you’re in the clear!
Copper wire or accessories can be toxic to air plants, especially when the copper is repeatedly exposed to moisture, which increases the coppers reactivity with the environment. The oxidation of the soft metal halts the uptake of nutrients and creates deficiencies for plants. Signs of copper toxicity in your plants may include iron chlorosis–yellow leaves with green veins–or burned tips on the leaves. Even slow growth and dark stubby roots may indicate that your air plants are being poisoned by copper. Since air plants only absorb nutrients through their leaves, they are particularly susceptible to copper toxicity.
The real challenge is correctly attributing these symptoms to real copper because they could be unhappy from a lot of other elements. Our suggestion is to either simply keep your plants away from copper looking things all together or, if you love the look of copper, seal the copper with a clear coating like Flex Clear before using it with your air plants. Problem solved!
Tillandsia Juncifolia covering the branches of a giant Ceiba tree in Guatemala.
Looking after these kinds of plants is reasonably simple. Frequent watering, beneficial air circulation and brilliant filtered light are very important aspects for their well-being. Immerse your plants once weekly in h2o for approximately 20 minutes or you can mist them all completely 2-3 times each week. If they live in a container or dish, enable them Three or four hours of drying time prior to relocating them back with their storage containers. Air plants take in the carbon monoxide from the air at night time rather than the day time. If the plant is damp, it can't breath effectively. Based on this info, it's always best to water in the morning. Make certain every container employed allow for ample air flow. Under no circumstances leave your plants in direct sunlight for extended intervals, they like filtered or indirect light.
Air plants flower once in their lives, but will develop pups or offspring during this period. Pups usually stays linked to the parent or could be segregated using a delicate twist/pull action at the bottom of the plant after the pup is one-third to one-half the length of the parent. In the event that the pups stay connected, merely eliminate the parent leaves when they wither and die. This will allow the pups to speedily fill the bare area.
Bulbosa seedlings attached to a narrow tree branch in the wild.
Air Plants could be grown just about anyplace. They may be added to driftwood, aged picture frames, seashells, or pottery. Make absolutely certain to not ever affix those to pressure treated wood, copper objects or copper cable because this will destroy your plant. Generally there are reasonably priced specific glues you may buy if you choose to attach them all.
A vertical garden with many species of tillandsia.
]]>Because air plants get many of their nutrients directly from the water, it is best to give them water that has plenty of minerals and nutrients in it. Rainwater is best, but if you don’t have an easy way to capture rainwater, the next best thing is spring water. You could also use creek water, lake water or well water. Do no use distilled or filtered water. Distilled and filtered water have less minerals and nutrients. Many municipal water systems have more chemicals and less minerals and nutrients. If you are PH conscious, air plants prefer slightly acidic water. The best range is between 5.5 to 6.0 alkalinity. City water from the tap is most often higher than this range and therefore not ideal for air plants. Do not be too worried about PH levels. Good clean water will be fine.
The second most important part of watering your air plants is properly drying them afterwards. It is very important to lay your air plants out on a dish towel on their side or upside down to let them dry completely. This is especially important for the larger species like Xerographica, Streptophylla, and Sparkler. They should be fully dry to the touch within 2 hours after their bath. Do not return your air plants to terrariums and vases until they are completely dry. Watering plants and then immediately placing them inside an enclosure may cause rot to develop in your plant. If you follow these simple watering instructions you will have happy and healthy air plants.
]]>
In northern climates Spanish Moss can be moved outdoors during the warm season. However, if placed too early in the Spring, birds may steal it away as an exotic, cozy nesting material.
The uses for Spanish Moss are varied. It can be used as mulch, a packing material, insulation or for arts and crafts. If commercially grown, it can be used as a stuffing for mattresses or furniture. During the first half of the twentieth century, moss was even used as packing for automobile upholstery. Moss picked directly from trees should not be used for stuffing or bedding as they may contain pests such as chiggers or red bugs. These insects may be removed by microwaving or boiling the moss for several minutes, however this will kill the plant.
A member of the Bromeliad or Bromeliaceae family, Tillandsia consists of a genus of approximately 540 species. Most commonly found in South America, Central America, parts of Mexico and the southern-most border states of the United States, these plants thrive in the deserts, mountains and forests areas of these regions.
Areas with abundant rainfall usually produce plants that have thinner leaves. Arid areas, such as deserts, that are subject to drought or have minimal rainfall usually produce plant varieties with thicker leaves. These plants support themselves in the dryer areas by collecting moisture and nutrients from the surrounding air. The sources of nutrients include dust, insect matter and decaying leaves which are gathered through leaf structures called trichomes.
Tillandsia are also know as epiphytes. Epiphytes are also referred to as air plants or aerophytes. Epiphytes, under most conditions do not need soil for growth, are not considered parasitic and attach to their host as a means of support only. Air plants mainly reproduce by generating pups or offsets. One plant can easily produce as many as 12 offspring.
Carolus Linnaeus coined the name for Tillandsia. His inspiration for the naming was the Swedish born Dr. Elias Tillandz, well known as a physician and botanist. Tillandsia are usually not produced or cultivated for their flowers, even though most will bloom at regular intervals. Many of these species tend to take on a change in leaf color when it comes time to bloom. The leaves will change from green to a reddish or purple hue. When a plant changes leaf coloring prior to blooming, this usually means they are monocarpic. Monocarpic plants are plants that flower one time prior to dying. As stated previously, the pups from the dying plant will continue to grow and will also bloom at some point in the future.
For the most part, the plants can tolerate a wide range of temperatures. Temperatures from 32 to 10 degrees Celsius or 90 to 50 degrees Fahrenheit. Frost for prolonged periods can cause damage to all but the hardiest of these plants. Tillandsia, has other benefits and properties. The plants contain properties that have been used to inhibit pollen-related allergies.
]]>This plant's unique form is due the extreme conditions in its native Andean climate. In Peru, Tectorum is seen growing in rugged, arid regions alongside cacti and agave in full sun. Due to the exposure to such bright ultraviolet light, the plants have adapted with large trichomes to reflect the strong solar radiation. Due to the variability of climate and elevation (from 3,000 to 8,200 feet) in their native range, mature Tectorum air plants vary significantly in size. Some plants will bloom at a mature size of only 3-4 inches in height and width, while I have personally seen others up to a foot tall and that are still yet to flower. Their flowers are a gentle pink with tiny, violet bracts.
The trichomes also serve to catch nutrients blowing in the wind in an otherwise low-nutrient environment. During the rainy season, the plants are subjected to bursts of heavy rain. Their open form allows them to dry quickly by catching the wind, in ecological necessity, so that their epidermis or "skin" under the trichomes is not saturated for too long, which would be detrimental to their natural transpiration or "breathing" process.
This bring us to our most import home-care instructions for Tectorum: It is very important that you do not submerge this species in water or let them remain wet for any length of time. This species will thrive on a thorough misting (nothing more) every 1-3 weeks. In addition, they require more light than other species due to so much of it being reflected. Direct sunlight in window settings are indeed appropriate for Tectorum.
Water Sparingly: Do not soak your Tectorum air plants. Note: This is different than our watering recommendation for all other tillandsia that we sell. Instead, give your tectorum plants a thorough misting every 1-3 weeks depending on your climate. Water with less frequency in humid or damp climates, and more in dry ones. Remove them from an enclosed globe or terrarium for misting, waiting for them to fully dry before displaying in enclosures again. The plants should be completely dry within an hour of watering.
Provide Bright Light: The tectorum's white appearance reflects a good amount of incoming solar radiation. Because of this, they require bright light to properly photosynthesize. They will do well in window settings. In low light conditions, they will likely not deteriorate but essentially cease all growth, which is a snail's pace even in optimal conditions.
Do Not Over Fertilize: Tectorum air plants come from an environment that is naturally nutrient-poor so they do not require the same amount of nutrients as other tillandsia. This is due to the fact that they are very efficient at absorbing what small amounts of nutrients are available. Simply misting your plants with mineral, spring, lake or well water should be more than enough to satisfy their meager nutritional needs. Over-fertilization with regular tillandsia food many cause foliar burn, unless significantly diluted.
Be sure to let us know how you like to show-off your Tectorum Ecuador in the comments below. Feel free to email us with specific questions to info@airplantsupplyco.com. If you are looking to purchase Tillandsia Tectorum Ecuador, find the retail listing here. For bulk orders (minimum order of 12 plants), shop here.
]]>What’s better than a small family of beautiful air plants? Answer: A large family of air plants and pups! Your air plants want to pass on their genes and will eventually start growing small “pups” at their base. These genetic copies will eventually become a new plant that can removed and grown separately saving you money as your air plant family grows!
When should you expect pups?
After the first bloom cycle an air plant will start its reproduction process by growing a very small “pup” at its base. The bloom cycle can take anywhere between 6 months and several years after birth. Patience is definitely a virtue when it comes to raising air plants. They seem to do things in their own sweet time. There are several things you can do to encourage pups but we will get to that in a moment.
These pups are the beginning of an entirely new and independent air plant that will eventually mature, bloom and propagate pups of its own. While air plants also seed and spread the traditional way, pups are an easy way to grow your collection. Let these adorable little pups grow to be at least one third to half the size of its mother. They don’t do so well on their own until they’ve grown up a little.
In the wild these pups would stay attached to the mother plant until it dies. This will produce beautiful clumps of air plants. Removing pups is not necessary if you want to let them grow au naturale. Large balls of plants are highly desirable and rare to find. They can be hung with wire or line and are really neat when placed in trees.
Tillandsia Caput-Medusae normally produces a pup within a month of the bloom drying up.
Pup Removal
If you like the idea of growing your pups separately you will need to perform a surgery of sorts. Don’t worry, no blood will be involved...hopefully. All you need is a sharp blade or knife, some good light and a new place to grow the removed pups. Simply cut the pup away from the mother at its base. Do your best to not damage the pup and error on the side of cutting more from the mother than the pup. It’s actually a very simple procedure that anyone can do. Sometimes the positioning of the pup allows you to easily snap it off between two fingers.
Once they are removed you can grow them just as you would a full sized plant. It’s really that simple. Owning air plants can be a very rewarding hobby but being able to propagate pups is one of the most exciting aspects of raising air plants. Please feel free to contact with us with any question in the comments section below.
Tillandsia Melanocrater quickly creates hardy pups that can be separated from the parent with a sharp knife or by gently pulling the pup from the mother.
]]>The Tillandsia Ionanthas are generally 1-3 inch tall plants that look like a miniature version of the top of a pineapple with several pointed leaves. Depending on availability, we offer large or extra large plants that can be up to 4 inches tall. They are prolific pup producers and like we mentioned above, create clumps if left to naturally multiply.
Ionanthas are found naturally in the Mexico, Central, and South America on tree branches or cliff faces. The variation that exists between the different Ionanthas is mainly due to elevation, climate, and conditions in their various native regions. Each has a coating a of trichomes so that they can absorb nutrients and water from the environment. This sometimes give them a frosted appearance.
If you would like to try one of these out, click the pictures to purchase from our site!
Height: 1-2 Inches
The hardiest of all of the Ionanthas. Ionantha Mexican produce brilliant red and orange blooms and they form into tight clusters when they start to pup. Even if you forget about them for a week or two, Ionantha Mexican almost always bounce back with a good soaking. They are stout, compact plants.
Height: 1-2 Inches (XL up to 4 inches)
This Ionantha is perhaps the most graceful. Our Ionantha Rubra often sport very symmetrical rosettes with gracefully curving leaves. They blush shades of light pink and produce purple, crocus-like flowers. When not in bloom they are a nice watermelon-green. Often we have XL plants available, like pictured below, that are near blooming stage and ready to produce pups.
Height: 1-3 Inches
Scaposas are a nice mint green color. Their leafing structure is much more vertical than the other Ionanthas. We love using these in our wine cork magnets. These are from higher, cooler elevations and prefer less direct light.
Height: 1-3 Inches
The Guatemalans are the most common tillandsia available and they are generally a hardy species with more rigid, pointed leaves than the Ionantha Rubras or Ionantha Mexicans. If not in bloom they are a nice, frosty green. Here in Florida, our Ionantha Guatemala grow fastest in the heat and humidity of the summer.
Height: About 1-2 Inches
"Fuego" means fire in Spanish. This Ionantha blushes bright red and its color can last for several weeks. Our Ionantha Fuego look great in teardrop terrariums and small displays. Our Fuegos are the most reliably red Ionantha, however they are occasionally sent all green.
]]>It's important to note that all air plants start small, either by a pup (off-set at the base of a mother plant that occurs after blooming) or from a seedling. However, the plants highlighted below are likely to stay small and compact throughout their lives. And of course, there are very few air plants that would be considered too large for the home environment. When we use size descriptions on our website, like "small" or "large" these are all relative to the species themselves. A large Ionantha Rubra is still going to be smaller than a Small Xerographica, as an example.
The Ionanthas are a special type of Tillandsia and probably one of the first air plants that you will encounter in your search for small plants. The Tillandsia Ionanthas are generally 1-3 inch tall plants with spiky leaves. They are prolific pup producers and will start creating clumps if left to naturally multiply. They are found naturally in the Mexico, Central, and South America. The variation that exists between the different Ionanthas is mainly due to elevation, climate, and conditions in their various native region.
Height: 1-2 Inches
The hardiest of all of the Ionanthas. Ionantha Mexican produce brilliant red and orange blooms and they form into tight clusters when they start to pup. Even if you forget about them for a week or two, Ionantha Mexican almost always bounce back with a good soaking.
Height: 1-2 Inches
This Ionantha is perhaps the most graceful. Our Ionantha Rubra often sport very symmetrical rosettes with gracefully curving leaves. They blush shades of light pink and produce purple, crocus-like flowers.
Height: 1-3 Inches
Scaposas are a nice mint green color. Their leafing structure is much more vertical than the other Ionanthas. We love using these in our wine cork magnets.
Height: 1-3 Inches
The Guatemalans can sometimes look a little unkept but they are generally a hardy species with more rigid, pointed leaves than the Ionantha Rubras or Ionantha Mexicans.
Height: About 1 Inch
"Fuego" means fire in Spanish. This Ionantha blushes bright red and its color can last for several weeks. Our Ionantha Fuego look great in teardrop terrariums and small displays. Our Fuegos are often sent with a red tinge.
Left to Right: Ion. Guatemalan, Ion. Rubra, Ion. Mexican, Ion. Scaposa, Argentea Thin, Funkiana, Ionantha Fuego
Height: 2-3 Inches
The first non-ionantha on the list! Argentea thin plants have mint green needle-point foliage. They look especially beautiful in round globes where their unique structure can be admired from all angles.
Height: 3-5 Inches
These spiky guys like to twist and turn in all directions. Mostly grassy green in color with a woody base, the Funkiana plants develop a bright red bud and flower when in bloom.
Height: 2-3 Inches
Tenuifolia is a bronze-leaved species native to Central America. We use this plant to judge when we need to water our air plants. When in need of water, Tenuifolia curl their leaves to protect against moisture loss. As soon as they are hydrated, the leaves flatten out again.
Height: 2-4 Inches
Filifolia is essentially a more green version of the Argentea Thin and they are occasionally mistaken for each other. Filifolia produce long, thin, forest green leaves and look great in terrariums.
Height: Variable
The butzii rounds out this top 10 list more for it's narrow width than it's short height. Butzii have a small round base, about a half inch across, and long, narrow arms that range anywhere from 2 to 10 inches tall. This variation allows them to be used in both containers and larger displays depending on their growth stage.
]]>Customers often email and call us about an unusual white, fuzzy substance on the leaves of their new air plants. They are always pleased to find out that this white fuzz is nothing to worry about, in fact, it’s the sign of a healthy, happy air plant. The mysterious white fuzz are called Trichomes.
Word Root:
Trichome is derived from the Greek word trikhōma (from trikhoun: to cover with hair).
Botanical Definition:
One of the hairlike or bristle-like outgrowths on the epidermis of a plant. Trichomes serve a variety of functions, depending on their location. As roothairs or leafhairs on epiphytes (air plants are Epiphytes) trichomes absorb water and minerals. As leaf hairs, they reflect radiation, lower plant temperature, and reducewater loss. They also provide defense against insects.
What does this all mean?
Trichomes are small hairs on the leaves of the the air plants which help them absorb water, airborne minerals, and helps them to regulate their temperature. Trichomes are important since air plants do not grow in soil and have traditional root systems. Trichomes can absorb moisture directly from the air, even without the plant having to get damped by rain, mist, or morning dew.
Xerographica, a popular species from Southern Mexico and Guatemala, uses it’s small trichomes to absorb moisture in the air, allowing it to flourish in the semi-arid highlands in these regions. If you really want to see a trichome-covered plant, check our our selection of Tillandsia Seleriana. They are huge and silvery because of the their thick coat of trichomes. Other species which have noticeable trichomes include Ionantha Guatemala and Caput Medusae.
]]>The leaf color of the various stricta air plants varies from a an iridescent silver, to to light green, to bronze. It is assumed that the natural variety seen in this species is due its inclination to hybridize with other tillandsias. We have seen very clear Stricta and Ionantha or Stricta and Brachycaulos mixes at the farm.
As is the case with all Tillandisa, Stricta are plants that anchor to a host, but are not considered parasitic. They have beautiful flowers that have a wide range of colors. These colors range from blue, purplish, yellow-white and pink. Shaped like a funnel, they can produce forty plus spikes that are slender in design. Their brilliant colors attract pollinators like insects and hummingbirds.
Stricta tend to have more linear leaves and rigid leaves, although some types, like Stricta Rio, are slightly softer. Leaf color ranges from a grayish green to a darker green and even hues of red. A blooming plant produces funnel shaped blooms that consist of three sepals and petals, each spreading from the middle of the bracts. Tolerant to low temperatures above forty-five degrees, these plants can thrive inside the home or outdoors. Make sure they have plenty of light, but not direct sunlight and they are in an area with ample air flow.
After blooming these plants produce a couple of offsets. We find they generally give about 3 good pups per mother plant. It is definitely slower to propagate this particular tillandsia than others.
Would like your very own? Shop here. We generally work with the soft leaf hybrids at Air Plant Supply Co. We are currently working on having Stricta Rio available for purchase.
Characteristics of Tillandsia Stricta:
Belongs to the Bromeliaceae family.
Height ranges from 4 inches to 6.5 inches.
Width ranges from 4 inches to 6.5 inches
In the category of bromeliad and perennial.
Tends to have irregular growing pattern
Leaves are usually coarse and evergreen
Tends to have showy blooms
Flower colors can be white, yellow, blue, purple or pink.
Tends to have a tolerance for higher temps, humidity and lack of water
Usually blooms in early to late spring
Usually does well with dappled to full sun
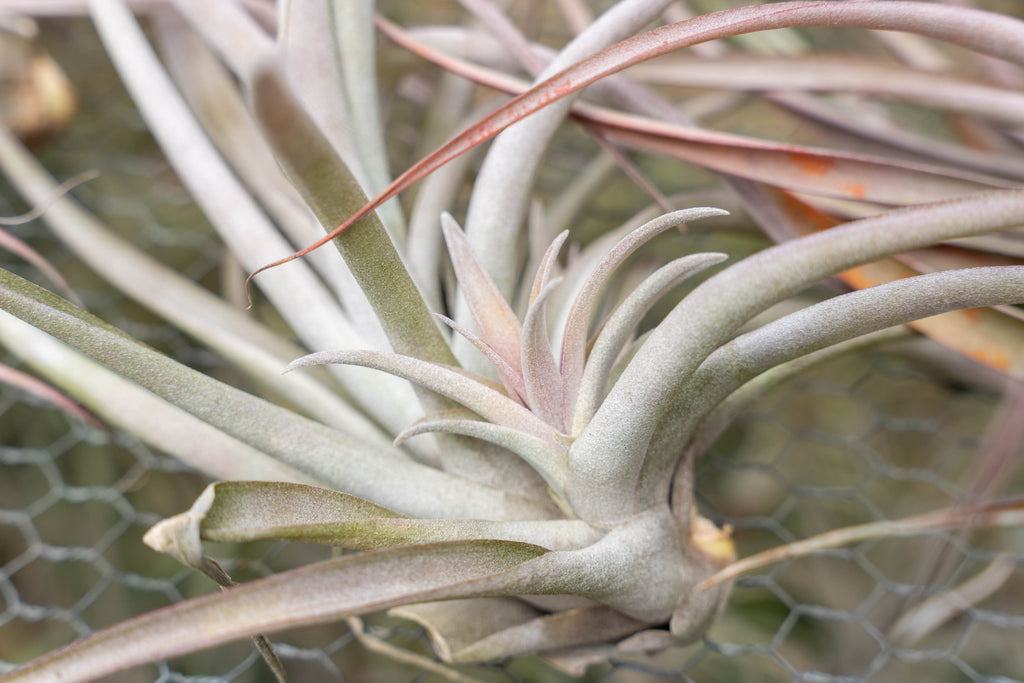
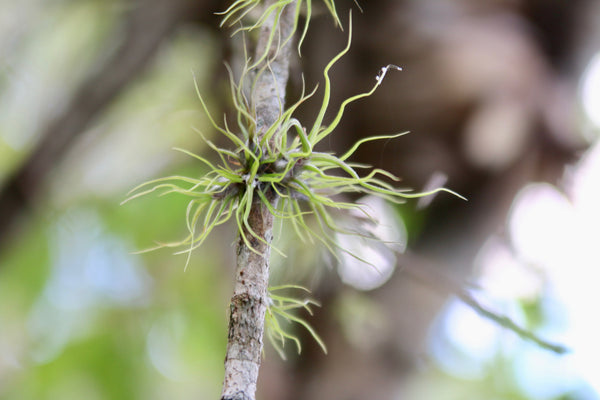
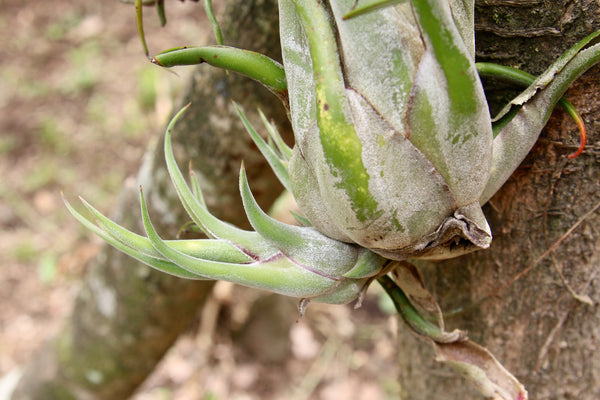
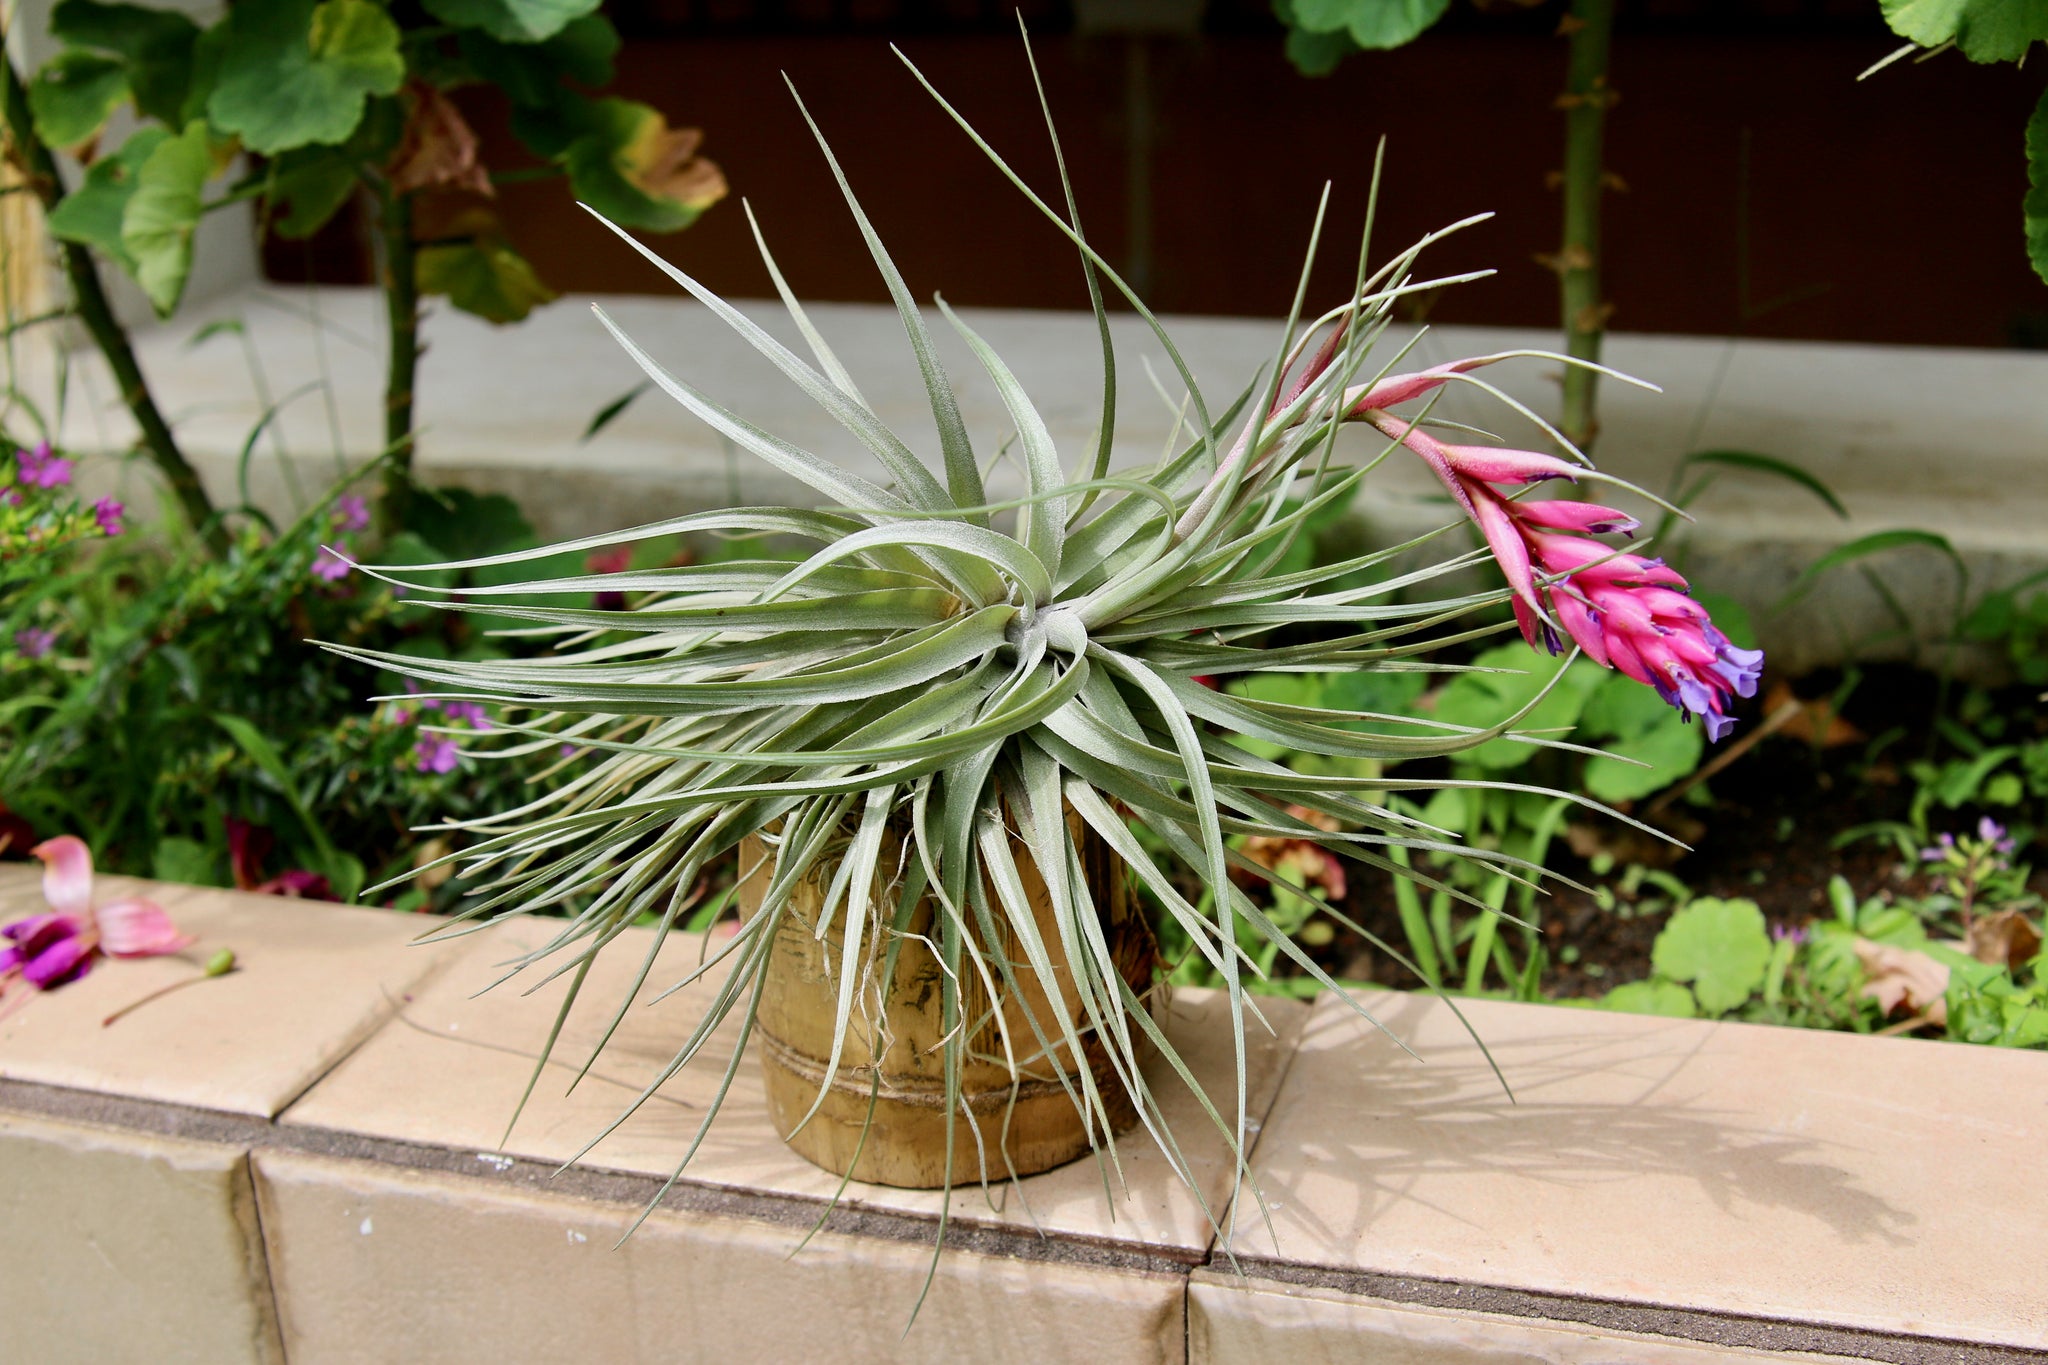
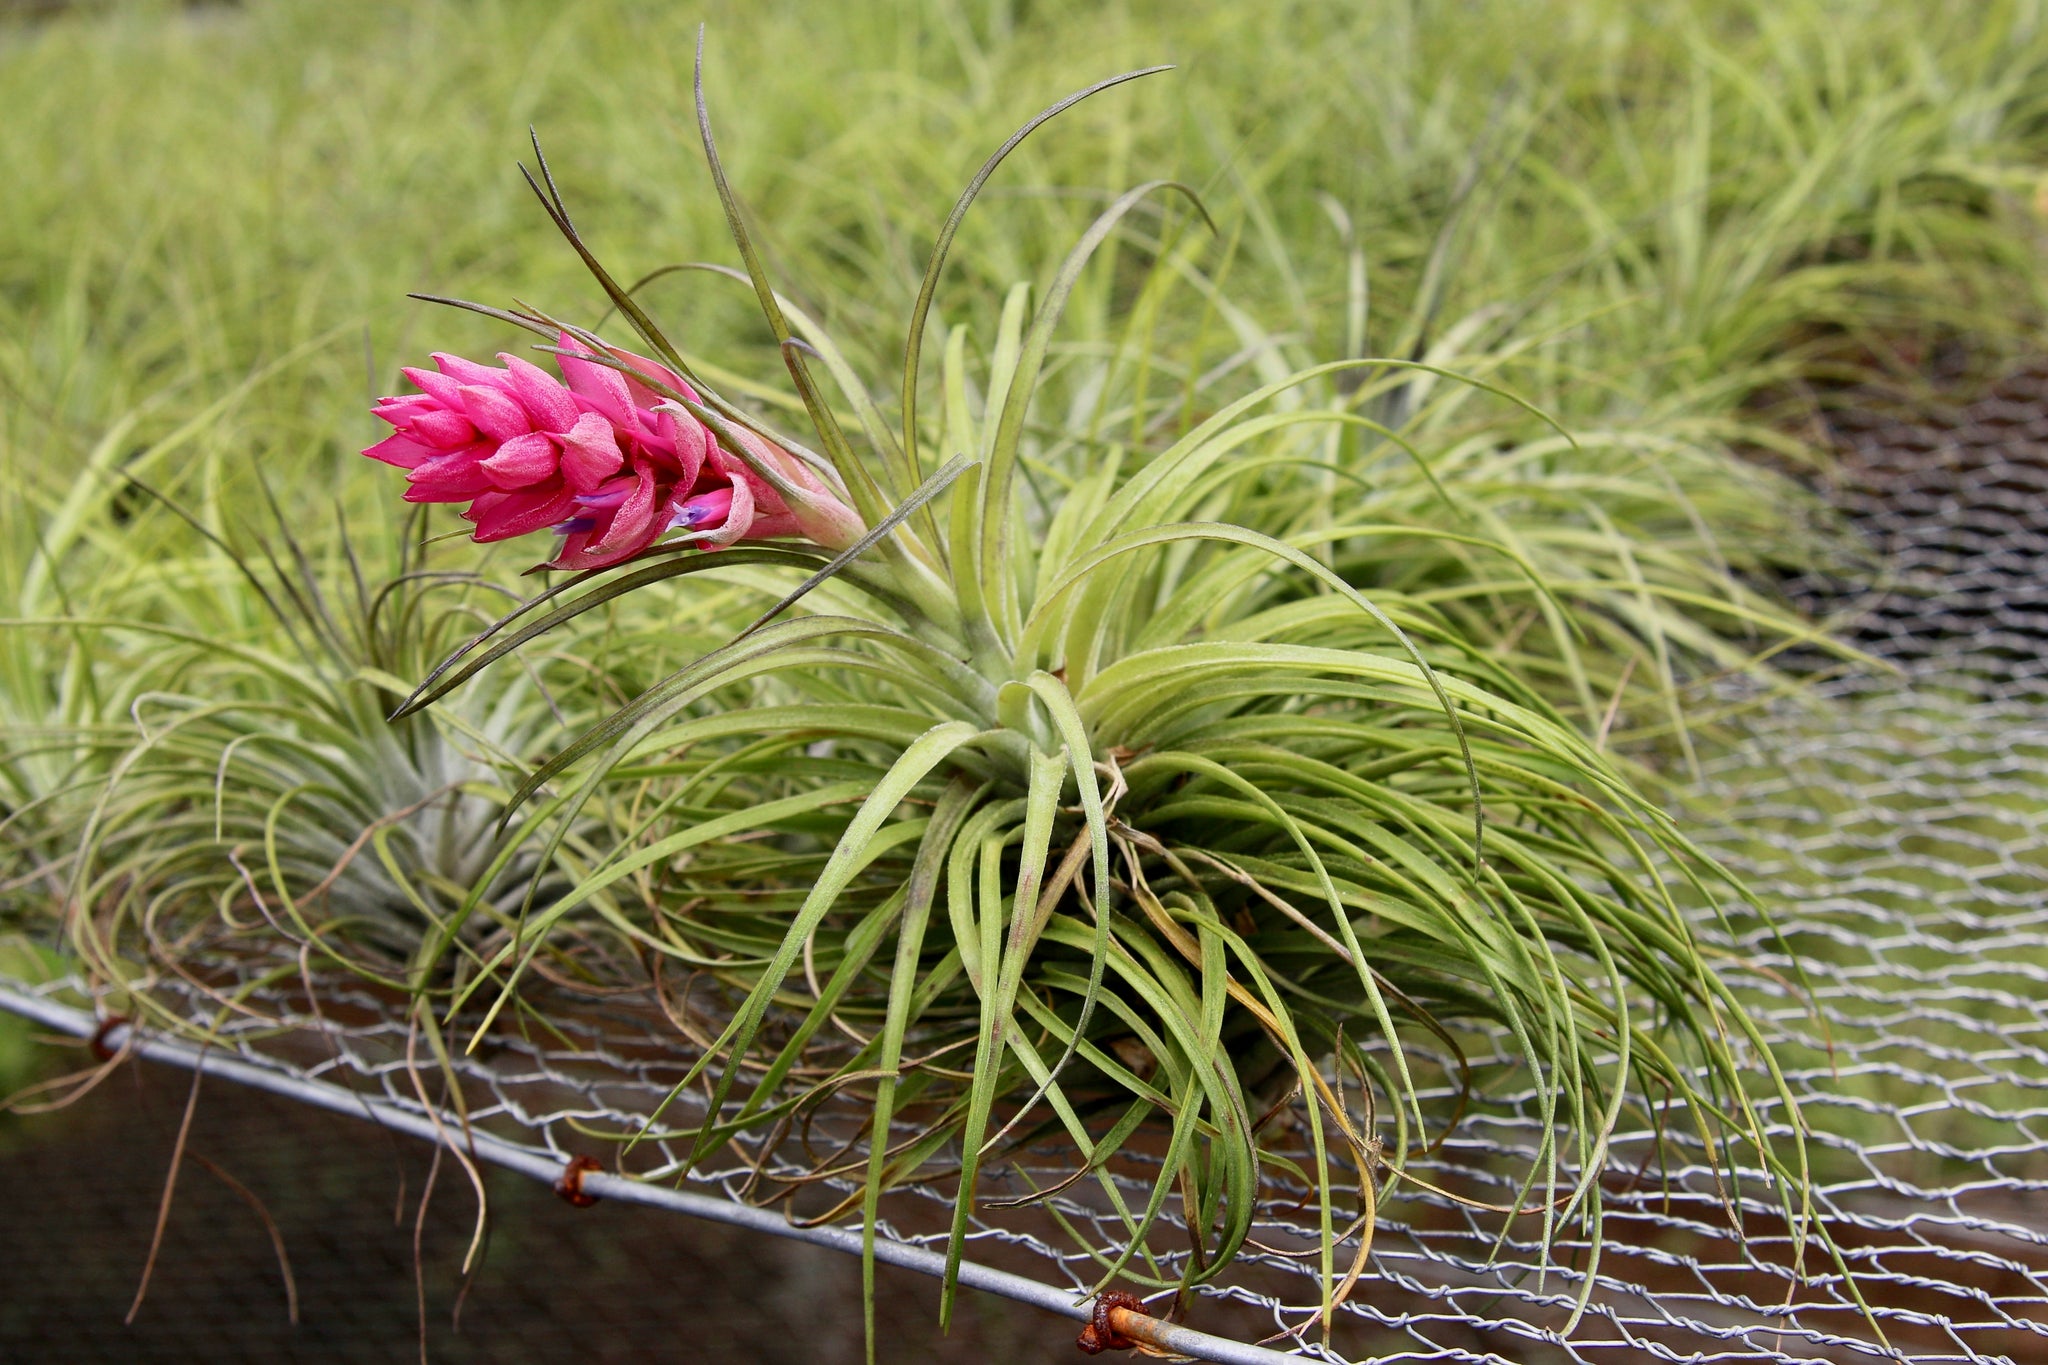
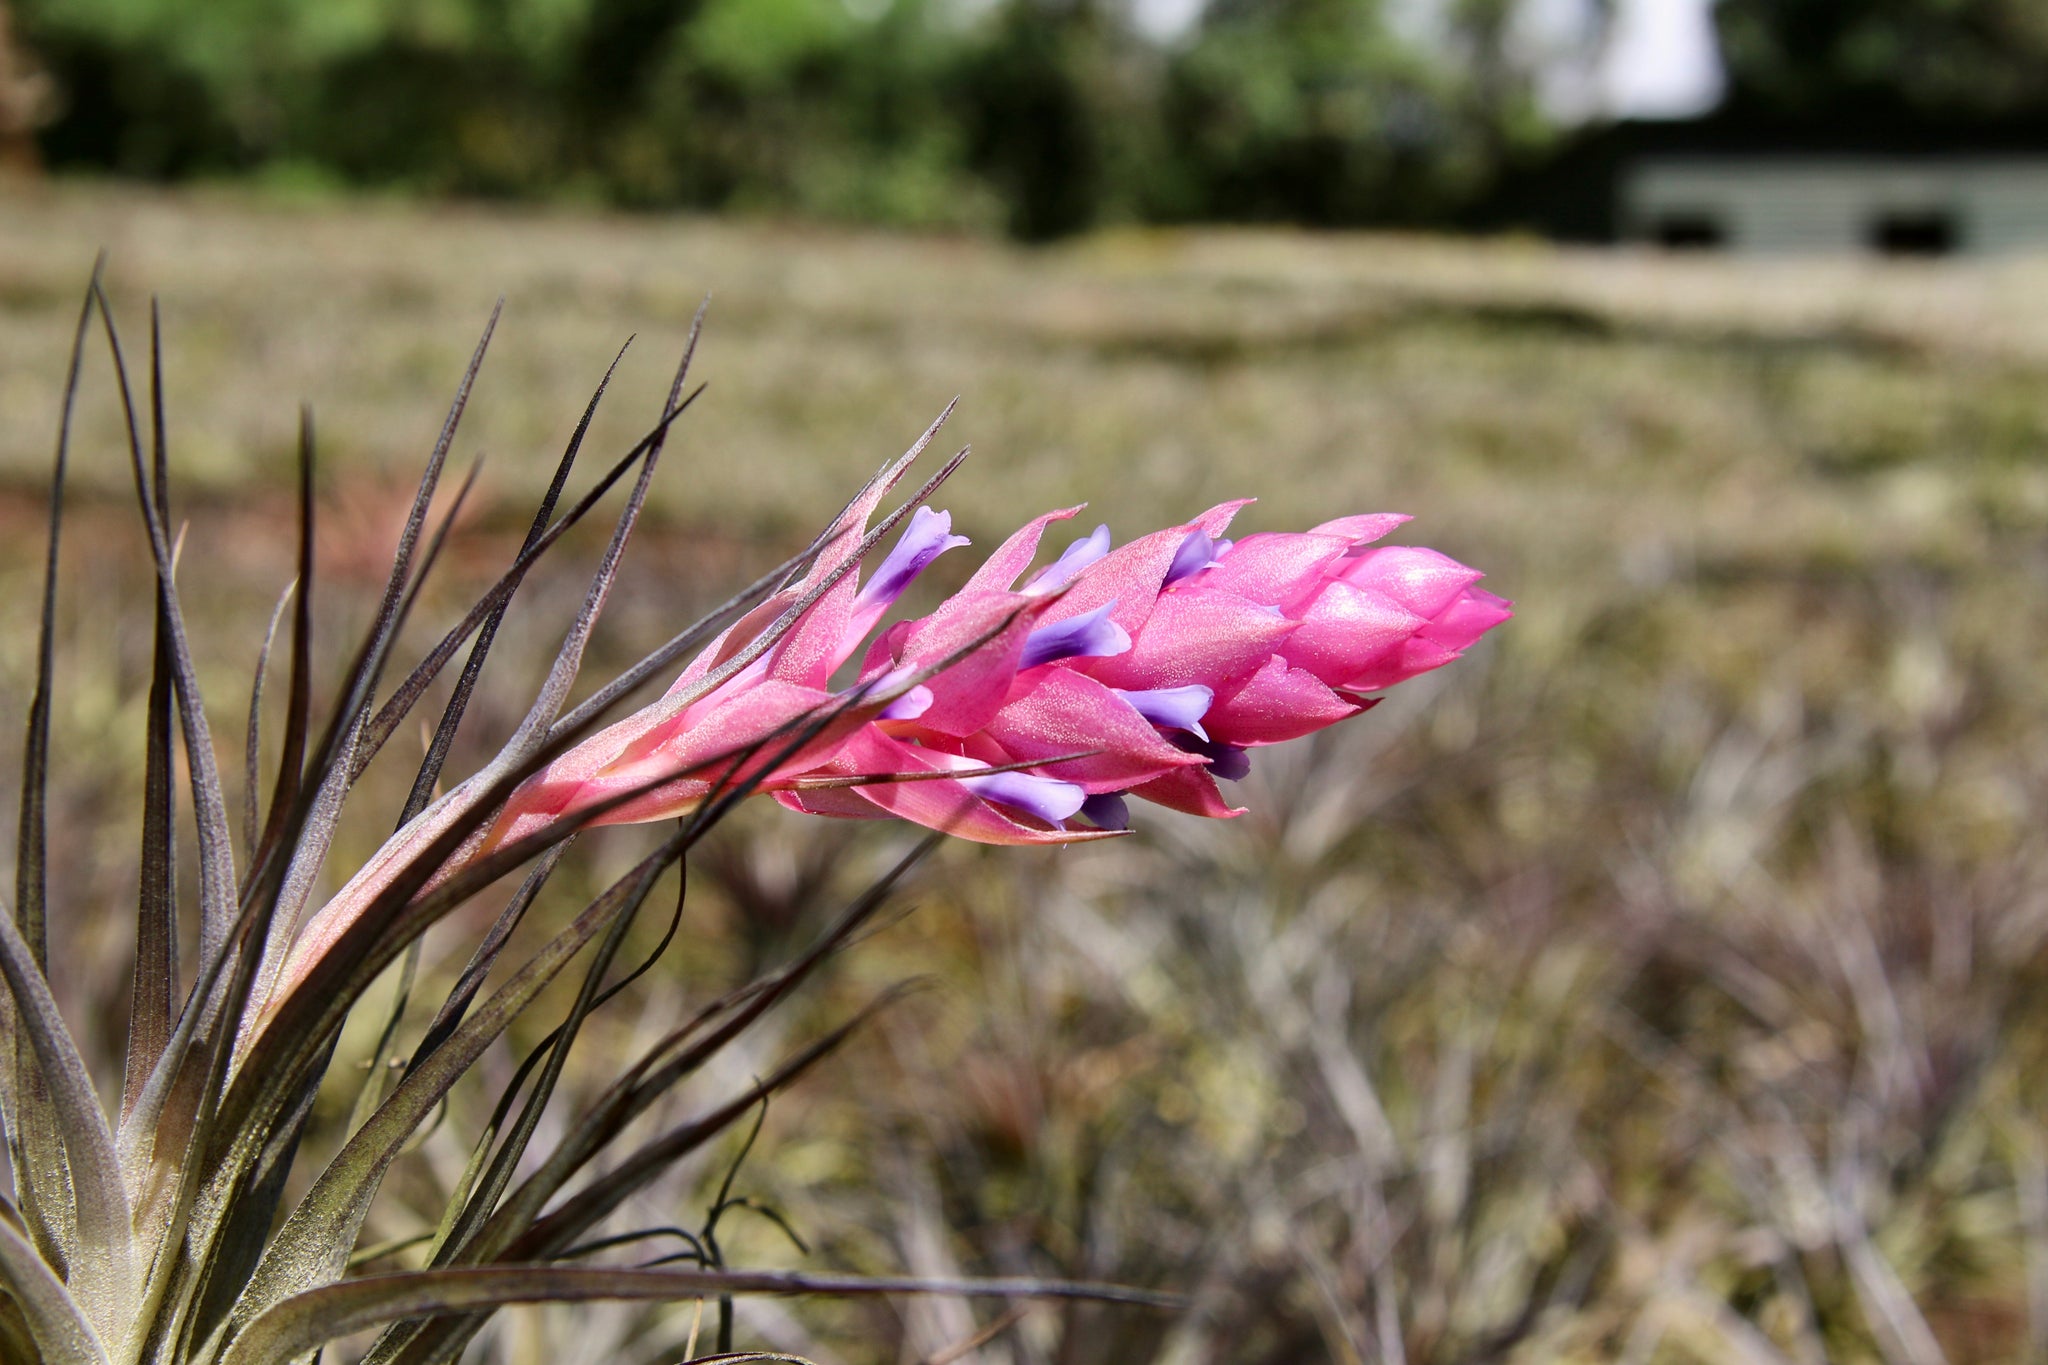
A bronze-leaved Stricta in cultivation.
Stricta Rio, native to the areas near Rio de Janeiro, Brazil has more green foliage and less conspicuous purple bracts in the booms compared to other Stricta in cultivation today.
]]>We suggest thoroughly rinsing your plants under running water or allowing them to soak in a water bath for 20-30 minutes as the primary watering method. You can use a bowl, sink, or even the bathtub for a group watering. After their bath,
gently shake the plants to remove excess water from both the base and leaves, then place them in an area with ample air circulation to dry completely within 3-4 hours. For interim hydration, misting the plants using a spray bottle works effectively. If your plant is in bloom, opt for rinsing rather than submerging it in water, and handle the delicate flowers with care.
Your plants should be watered at least once a week. The frequency of watering depends on your location's climate. In warmer regions or areas with low humidity, air plants may need extra water two to three times weekly. Using a spray bottle to mist the plants every few days in between regular waterings can maintain their hydration. However, the preferred method is soaking the plants, as it yields the best results. For more information about keeping your air plants properly hydrated, read our Air Plant Watering: Hydrated vs Dehydrated Plants blog.
Different varieties of air plants have specific environmental requirements. Those with soft, thin leaves, including Spanish Moss, thrive in cooler temperatures. If you notice leaves curling dramatically or appearing droopy, move them indoors. These plants require adequate air circulation and should be kept away from direct sunlight and enclosed receptacles.
On the other hand, air plants with stiff or thicker leaves, such as Xerographicas, are hardier and require less water. They adapt well to warmer, drier conditions and are more tolerant of direct sunlight.
If you choose to display your air plants in containers like terrariums or bowls, always remove them before watering. Enclosed vessels can trap moisture, leading to rot, primarily starting at the base of the plant. Regularly check the base of your plants for signs of rot and adjust your watering routine accordingly.
If you plan to secure your air plant to objects like driftwood, select materials that can be immersed with the plant and will dry completely. Ensuring proper drying prevents moisture buildup, reducing the risk of rot.
Mastering the art of watering air plants involves a keen understanding of their individual needs and environmental factors. By following the guidelines mentioned above and observing your plants closely, you can create an optimal environment for your air plants to flourish. Remember, each air plant is unique, so be attentive to their responses and adjust your care routine accordingly. With the right balance of watering, proper air circulation, suitable sunlight, and temperature control, your air plants will thrive, adding a touch of natural elegance to your living space.
Stay up-to-date in the air plant world by following us on Facebook, Instagram, and TikTok!
]]>
Air circulation for these plants is crucial. Without fresh flowing air they are deprived of proper moisture and carbon dioxide. Bug and fungal infestations are increased for plants that do not receive proper air flow, this can cause a decline in the health of the Bromeliad. Turning a fan on low or opening a window on warmer nights is a simple but effective way of keeping your plants happy and healthy.
Light extremes are less of an issue with Bromeliads. Direct sunlight, indirect light and even low light conditions seem to work well with these types of plants. The following is a simple guide for providing the best light environment for your particular variety. Species that have leaves with a softer texture, greenish in color and thinner leaves, generally do better with indirect light. Species that are stiffer, grayish in color and have thicker leaves seem to enjoy more direct sunlight.
Watering Bromeliads is straight-forward and simple since they are capable of surviving long periods with little or no water. Usually issues arise if the plants are watered too much as this tends to cause root rot. Soil that does not drain well can also cause problems. Potting soils that are porous and drain well should be used to help ensure the continued health of your plant. Water your plants completely, you can tell when this process is complete if water runs out of the bottom of your container. Check the surface soil weekly and if it feels dry, then water it according to the process mentioned previously. During cooler periods of if your plant is in an air conditioned area, check the soil twice weekly.
What are Epiphytes?
Epiphytes are plants that grow or attach themselves on other plants for support. Their root systems are only used to attach and hold themselves in place and not usually for acquiring water and nutrients. That is where they get their name, from the Greek epi- (meaning 'upon') and phyton (meaning 'plant'). Why is this important? Getting up off the ground away from grazing animals, wild fires or flooding and running waters is a very advantageous adaptation that has allowed these unique species survive. It is a survival method that seems to have allowed for a very unique survival.
Where do they get their nutrients if they don’t use soil?
When epiphytes left the soil behind they had to get nutrients another way. One simple way would become parasites and steal nutrients from their plant hosts but epiphytes took another route. Being a parasite is dangerous when you accidently kill the host. Air Plants found a good compromise. Their leaves adapted to take in both moisture and nutrients while their roots primarily took care of attaching themselves to other plants. Air plants can still use photosynthesis to produce foods but some have to rely on it less due to their shady environments under tree canopies. To make up the difference some Air Plants have developed trichomes on their leaves to catch and absorb nutrients from both air and water. Trichomes are the white fuzzy hairs that are visible on many Air Plant Species. These little hairs catch moisture and dust particles in the air and allow the plant to feed and hydrate itself. Minerals in fog, rain water and leached from the tree or plant host itself are enough to keep Air Plants healthy, fed and happy.
Because this method of gathering nutrients can cause longer waits between meals Air Plants have adapted to do their breathing at night. In order to keep valuable moistures inside the plant they only open the stomata on their leaves to ‘breath in’ carbon dioxide. During the day they use photosynthesis to turn that Co2 into energy and food! This amazing adaptation means that you should avoid watering your Air Plants at night or in the evening so you don’t interrupt this important process.
Knowing more about your Air Plants and understanding how and why they do what they do will help you better care for and enjoy the entire process of raising these amazing plants. They truly are unique and fascinating plants that have adapted and become incredible survivors on this wildly diverse planet.
]]>